Start interactive tutorial
Meetup Clone with Context API
Technologies: HTML, CSS, JS, React, React Hooks, React Router and React Context API.

👆 This project is optimized for groups of 2 or max 3 students.
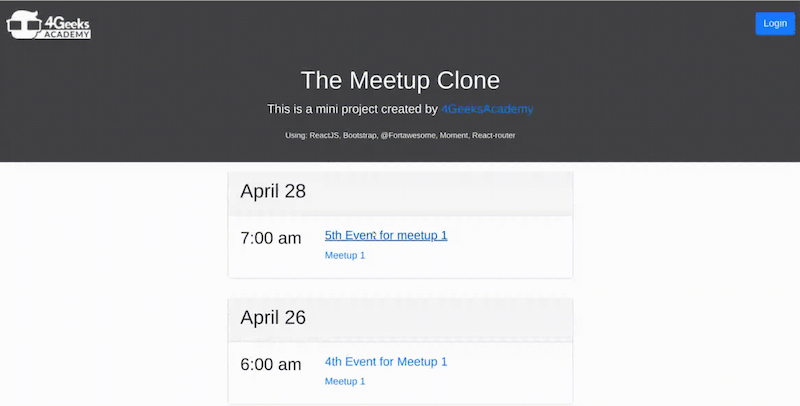
Hello! It is time to begin creating professional front-end applications. This time we will be building a small Meetup.com clone that allows users to Browse and RSVP events, very similar to how Meetup.com works.
📹 Here is a video on how the application must work
- Event's is the main Entity on this application, the main view (Home) will have a list of Event's organized by date.
- Each Event is linked to a single Group.
- A Group can be linked to one or more Event's (one to many).
This project is meant to be done in two phases
First, we want to focus on the visuals; make sure the viewable structures are working correctly. Secondly, we should implement dynamic data display.
Phase 1: Create the views, then link them with React Router in your Layout Component.
Each group must create the following views:
- Home (List of Events)
- Event detail (View of a specific Event)
- Group detail (View for the Group with a list of upcoming events for the group)
1🗒NOTE: You should draw wireframes first to gather your ideas. Also, make sure to use dummy content initially. PLEASE USE MEETUP.COM AS A DESIGN REFERENCE!
Each Group entity must have
1- Title
2- Description
3- Members
Each Event Entity must have
1- Title
2- Description
3- Date
4- Time
5- Group (This is an ID for the group)
After you finish your wireframes, get to coding. Please make sure to only use functional components and if you need to define state variables or do something during the component lifecycle, use the corresponding hooks. (useState() and useEffect())
Note: Think DRY (Don't repeat yourself) and declare only one component and use props to handle a similar structure but different content. Context should be used only when you need to share data between many views. Always use props when you can and context sparingly.
REMEMBER: Anchor tags will cause a redirect, which you don't want in React. Be sure to import and use the Link component from React Router to implement the navigation between views.
1
2<Link to="/event">
3    Title of event
4</Link>
Phase 2: Make the app dynamic by implementing React Context
React context is built into the flux boilerplate. If you are having trouble understanding how context works, please take a look at the demo component that comes with it. (In your views folder)
Use the store to fill the dummy content within the views/components. The store is accessible using the Context.Consumer
Reference: Using the Context
The store structure (/store/store.js):
Below, you will find an example of the date for the Meetup clone. This consists of 2 arrays (events and meetups) and an abject for the user session.
You can replace your current store object with this data and even expand it to add more events and groups. Remember that this is placeholder data for now. Later on, we will be using fetch to pull the data in from an API.
1store: {
2    events:[
3        {
4            ID: 36,
5            post_content: "Lorem ipsum dolor sit amet, consectetur adipiscing elit. Sed nec libero consectetur risus vehicula interdum eu at elit. Proin a commodo erat, eu molestie ipsum. Aliquam tristique nunc a est tristique, et convallis risus ullamcorper. Fusce nec massa ac enim pellentesque ornare. Pellentesque non sapien varius, pellentesque tellus sit amet, facilisis justo. Duis rhoncus nunc id elementum dapibus. Sed dictum lacinia vestibulum.",
6            post_title: "Lorem Event",
7            meta_keys: {
8                day: "20180428",
9                time: "07:00:00",
10                _groupId: 9,
11                _rsvpNo: [
12                    "robert",
13                    "jjtime",
14                    "username2"
15                ],
16                _rsvpYes: [
17                    "cheeselover",
18                    "neweradude",
19                    "james1996"
20                ]
21            }
22        }
23    ],
24    Groups:[
25        {
26            ID: 9,
27            post_content: "The nicest Meetup ever",
28            post_title: "Tech Enthusiasts",
29            members: [
30                "robert",
31                "jjtime",
32                "username2",
33                "cheeselover",
34                "neweradude",
35                "james1996"
36            ]
37        }
38    ],
39    session:{
40        ID: 2,
41        username: "theUser",
42        user_friendly_name:"Joey",
43        token: "qwerty12345asdfgzxcv"
44    }
45};
In order to have access to the global data from your store in one of your components, you must import the Context. See the example below.
1
2import { Context } from '/path/to/store/appContext.jsx';
3
4const MyView = () => {
5    const { actions, store } = useContext(Context);
6    //Then use the Consumer anywhere on the component
7    return (<span> hello, {store.events[0].post_title} </span>);
8}
All of your Fetch/AJAX calls should be in the useEffect() section of the appContext.js file. Due to the way the boilerplate is built, this area handles the calls that are done only at the initial load of your application.
🌱 How to start this project
Do not clone this repository.
- The first step to start coding is cloning the react flux boilerplate on your local computer or gitpod.
a) If using Gitpod (recommended) you can clone the boilerplate by clicking here.
b) If working locally, type the following command from your command line:
1$ git clone https://github.com/4GeeksAcademy/react-hello-webapp
💡 Important: Remember to create a new repository, update the remote (git remote set-url origin <your new url>), and upload the code to your new repository using add, commit and push.
-
Install the dependencies
$ npm install. -
Run the WebPack development
$ npm run start. -
That's it! Time to code.
"The scariest moment is always before you start" Stephen King