Inputs
HTML and CSS
Understanding HTML Input HTML Text Area and Forms...
HTML Forms
This lesson is very easy to understand, but it is essential because with this new knowledge, all the interactivity of the internet will be relayed. There are a few additional HTML tags that we need to discuss before continuing with the course. They are the first possible ways of interaction that were introduced in HTML: The Inputs and Forms.
Like always, let’s compare our website with an MS Word document… At some point scientists needed to create forms just like the ones we fill out when we pay our taxes: with blank spaces available for the user to fill in with their Name, Last Name, Date of Birth, etc.

The elements that the user fills in a form are called <input> and they always have to be wrapped inside a <form> tag. You can also use all the other HTML tags we learned in the previous lessons without any problems.
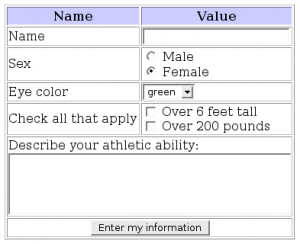
Here is an example of a simple form in HTML:
The following is a list of all the possible elements we can use to receive any input from the user:
| Name | Declaration | Description |
|---|---|---|
| Text | <input type="text"> | The text input is meant to receive any small string of characters such as: Username, Name, Last Name, Date of birth, etc.<input type="text" name="Name" /> |
| Textarea | <textarea> | The textarea is ideal for long text inputs. Its main difference from the text input is its ability to allow for multiple lines.<textarea name="comments"></textarea> |
| Password | <input type="password" /> | This is just like an input type="text" but with the only difference that the characters are hidden like bullets. The user cannot see what they are typing.<input type="password" name="password" /> |
| Radio button | <input type="radio" /> | Allows the user to select only one of all the available inputs with the same name.<input type="radio" name="color" value="red" /> <input type="radio" name="color" value="green" /> |
| Checkbox | <input type="checkbox" /> | Similar to type="radio", but this type lets you select multiple values of the same category.<input type="check" name="color" value="green" /><input type="check" name="color" value="blue" /> |
| File | <input type="file" /> | This is the only way to work with files. For example: It’s what websites use when they ask you to upload a picture.<input type="file" name="photo" value="" /> |
| Submit Button | <input type="submit" /> | When the form is ready to be sent, the user presses this "submit" button and everything is then sent to the server for processing.<input type="submit" value="Send Form" /> |
| Select | <select> | Asks the user to pick one or more elements from a list of options.<select name="color"> <option value="red">Red</option> <option value="yellow">Yellow</option> </select> |
Input Attributes
Just like any other HTML tag, the input tags have several attributes that can be set to describe their behavior in more specific ways:
VALUE: You can specify a default value that the input should have before it starts getting filled by the user:
1<input type="text" name="firstname" value="John"/>
READ ONLY: Determines if the user is allowed to change the value of the input.
1<input type="text" name="firstname" value="John" readonly/>
DISABLED: Determines if the input is going to be gray and read-only. The disabled inputs are not sent to the backend – they act as if they never existed.
1<input type="text" name="firstname" value="John" disabled/>
SIZE: The maximum number of characters allowed for that input.
1<input type="text" name="firstname" value="John" size="40"/>
The Form Attributes METHOD and ACTION
The two most important attributes that need to be set into the <form> tag are action and method:
Action: Is the URL where the data collected from the form is going to be sent.
1<form action="/action_page.php">
Method: It could be either "POST" or "GET". The main differences will be:
- How the collected data is going to be sent to the destination page once we arrive there.
- How the form data is submitted to the server.
| GET | POST |
|---|---|
| All form data is encoded into the URL. This means that it will append all the information of the form to the end of the destination URL. For example, http://www.mydestinationurl.com?input_name1=value1&input_name2&value2… | The data will be completely hidden from the end-user. The URL will remain as it was defined in the "action" attribute, and only a developer will be able to request the form information. |
☝ If you are going to use the
<input type="file"/>the only supported method is POST.