windows
forensics
e01
ftk-imager
cybersecurity
Create a Forensic Image (.E01) from Windows Using FTK Imager
In digital forensics, an .E01 image allows you to capture the complete contents of a hard drive without altering the original. This file can contain metadata, be split into smaller parts, and be automatically verified using hashes. Below, two ways to generate an .E01 image are explained: one from a physically connected hard drive, and another from a virtual machine file.
Creating an Image from a Hard Drive Connected to the Computer (on Windows)
Suppose a hard drive was removed from a suspect computer. The analyst connects it to their workstation using a SATA-USB adapter or an external enclosure. The goal is to make a bit-by-bit copy of that disk without modifying it.
For this, FTK Imager will be used, a free tool that allows you to capture disks and generate forensic images in .E01 format.
Steps:
-
Download and install
FTK Imager. -
Open the program as administrator.
-
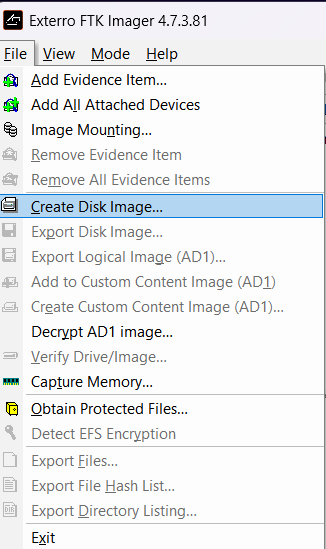
-
Choose the
Physical Driveoption. A list of connected disks will appear. Select the external disk (make sure it is not your system disk). How do you do this? When you select Physical Drive in FTK Imager, you will see something like:1PhysicalDrive0 - 500GB - WDC WD5000LPCX-... 2PhysicalDrive1 - 120GB - SanDisk SSD PLUS... 3PhysicalDrive2 - 16GB - Generic USB Flash...Check if the size matches your external disk. The system disk is usually
PhysicalDrive0, so you should not select it unless you are absolutely sure it is the external disk (which is almost never the case). -
Fill in the case fields (for example: case number, examiner name, analysis description). These can be left blank if this is for practice.
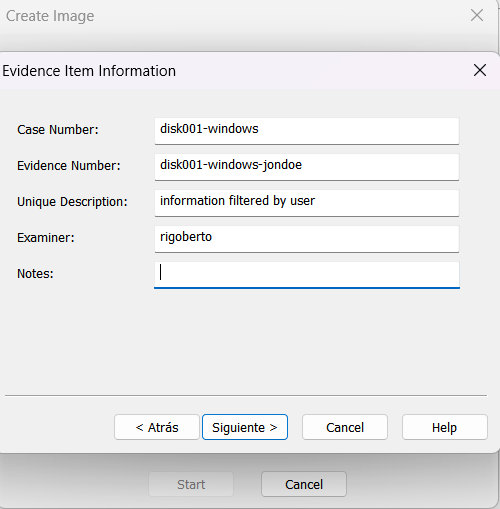
-
For image type, select
E01 (Expert Witness Format).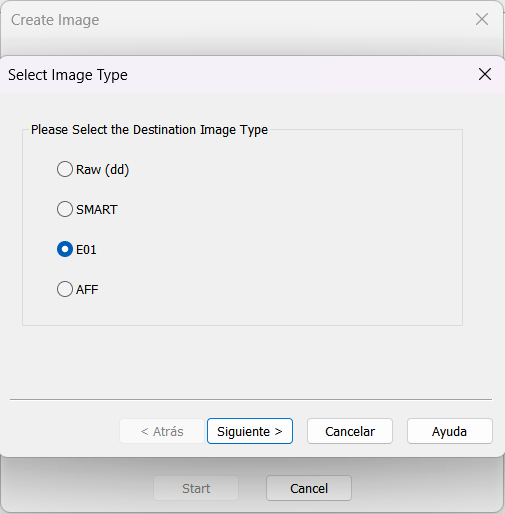
-
Choose a destination folder to save the image.
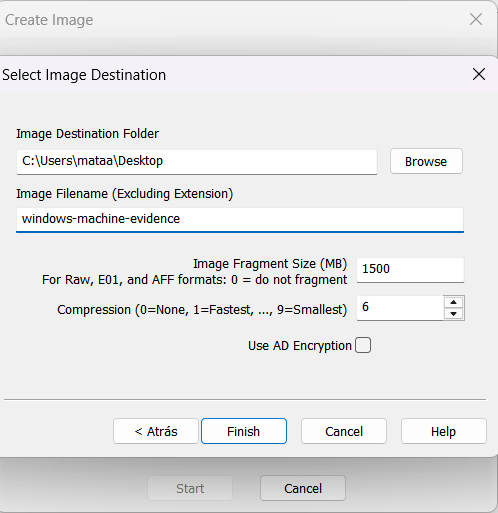
In the configuration options:
- Compression: set the value to
6(fast). - Fragmentation: use
1500 MBto split the image into more manageable parts.
-
Press
Startto begin acquisition. Make sure to enable the "Verify images after they are created" option to ensure the integrity of the copy.
When finished, you will get a series of .E01, .E02, etc. files, along with a .txt file documenting the generated hashes and case details.
Creating an Image from a Virtual Machine (.vdi or .vmdk file)
When working with virtual machines, you do not have a physical disk, but a file representing it. In VirtualBox, this file has a .vdi extension; in VMware, .vmdk. The contents of these files can also be forensically analyzed, but first they need to be converted.
Step 1: Convert the Virtual Machine File to .raw
The .raw format is a direct copy of the virtual disk contents. To obtain it, use the qemu-img tool.
- Download QEMU for Windows from qemu.weilnetz.de.
- Extract or install QEMU and locate the
qemu-img.exefile. - Open the terminal (CMD or PowerShell) and run the appropriate command according to your disk type:
For VirtualBox:
1qemu-img convert -f vdi -O raw "C:\path\to\file.vdi" "C:\output\image.raw"
For VMware:
1qemu-img convert -f vmdk -O raw "C:\path\to\file.vmdk" "C:\output\image.raw"
Step 2: Convert .raw to .E01 with FTK Imager
-
Open FTK Imager as administrator.
-
File → Create Disk Image... -
Select the source type, in this case
Image File: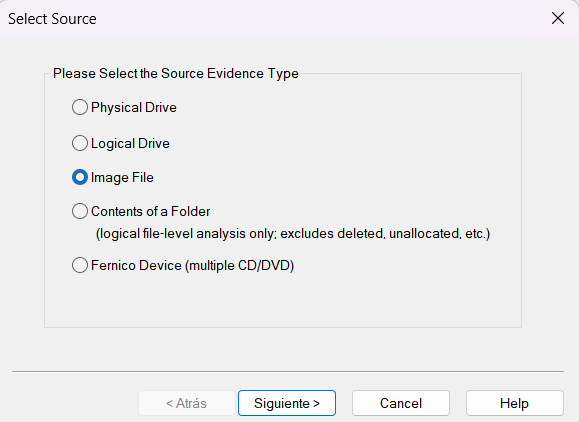
-
Select the
.rawfile as the source.
Make sure to enable the "Verify images after they are created" option to ensure the integrity of the copy.
-
Then, click Add to define the output image type and where it will be saved, select:

-
Fill in the case metadata.

-
Choose the destination folder, file name, compression, and fragmentation.

Leave the “Use AD Encryption” option unchecked.
-
Press Finish, then Start to begin creating the image.
Expected Result
FTK Imager will generate:
-
Segmented files:
.E01,.E02,.E03, etc. -
A
.txtfile with the verification hash and case metadata
These files can be analyzed directly with tools like Autopsy or reloaded into FTK Imager for exploration. It is important to keep all files together in the same folder and not change their names if you want to maintain the integrity of the evidence.