Start interactive tutorial
Attacking with spoofing and DoS on a WordPress website
This practice will allow you to better understand spoofing and DoS techniques, as well as their effects in a web environment.
🌱 How to start a project?
Do not clone this or any repository, follow the instructions below:
Requirements
For this specific practice of Spoofing and DoS, it is best to set up the network as an Internal Network. This is due to several reasons:
-
Complete Isolation: Ensures that attack and test activities do not interfere with the production network or other external networks. This prevents any potential unwanted impact on other systems.
-
Controlled Environment: Allows complete control over the network environment, facilitating the monitoring and analysis of network traffic generated during the tests.
-
Realistic Simulation: Although isolated, an internal network can effectively simulate a real network environment for Spoofing and DoS practices.
Tools and Virtual Machines
- Oracle VirtualBox
- Virtual machine with Kali Linux (Attacker)
- Virtual machine with Debian (Web Server): Where we have the Apache server and the WordPress site hosted.
- Spoofing and DoS tools installed on virtual machines.
- An isolated network environment.
- Necessary tools: arpspoof, hping3, wireshark
📝 Instructions
Step 1: Configure the Network in VirtualBox
Configure the Network of the Debian Machine (Web Server):
1ip addr show
You will generally find lines labeled as eth0, enp0s3, wlan0, etc. The one that is active and has an assigned IP address will be the interface you are using.
1sudo nano /etc/network/interfaces
1auto enp0s3
2iface enp0s3 inet static
3    			address 192.168.1.10
4    			netmask 255.255.255.0
5    			gateway 192.168.1.1

Example configuration for both files (Kali and Debian), may contain more commands than shown, but add any missing commands from the previously provided configuration, as they will be necessary.
1sudo systemctl restart networking
Configure the Network of the Kali Linux Machine (Attacker)
1ip addr show
You will generally find lines labeled as eth0, enp0s3, wlan0, etc. The one that is active and has an assigned IP address will be the interface you are using.
1sudo nano /etc/network/interfaces
1auto eth0
2iface eth0 inet static
3    			address 192.168.1.11
4    			netmask 255.255.255.0
5    			gateway 192.168.1.1
1sudo systemctl restart networking
Step 2: Verify the Connection Between the Machines
From the Kali Linux Machine (Attacker):
1$ ping <IP_debian>
Replace <IP_debian> with the IP address you obtained for the Debian machine.
From the Debian Machine (Web Server):
1$ ping <IP_kali>
Replace <IP_kali> with the IP address you obtained for the Kali machine.
Graphical example of how pings look when connected
Step 3: ARP Spoofing Practice
To carry out this practice, we will use arpspoof. This tool is used to send spoofed ARP packets to the network, making a device (like the Debian machine) believe that the attacker's MAC address (Kali Linux) is the MAC address of the gateway (router). This can be verified by observing the ARP tables on the Debian machine before and after running arpspoof.
On the Kali Linux Machine (Attacker):
1sudo apt update
2sudo apt install dsniff
Note: arpspoof is part of the dsniff package..
1sudo arpspoof -h
1sudo arpspoof -i <interfaz_kali> -t <IP_debian> <gateway>
- -i <kali_interface>: Specifies the network interface from which ARP packets will be sent, e.g., eth0.
- -t <IP_debian>: Specifies the victim's IP address (the Debian machine in this case).
: Specifies the gateway's IP address. (initially configured in the /etc/network/interfaces file, it is the same for both machines)
Monitor with Wireshark on the Debian Machine (Web Server):
Wireshark is ideal for analyzing network traffic, identifying possible attacks, and monitoring security in a network environment.
1sudo apt update
2sudo apt install wireshark
During the installation, you might be asked if non-root users should be able to capture packets. Select "Yes". If you completed the installation without this setting, you can configure it later with:
1sudo dpkg-reconfigure wireshark-common
1sudo usermod -aG wireshark $USER
NOTE: $USER is the username you use on the Debian virtual machine.
Once the installation is complete, log out and back in to apply the group changes. You can start Wireshark by running:
1sudo wireshark
Monitoring and Analysis

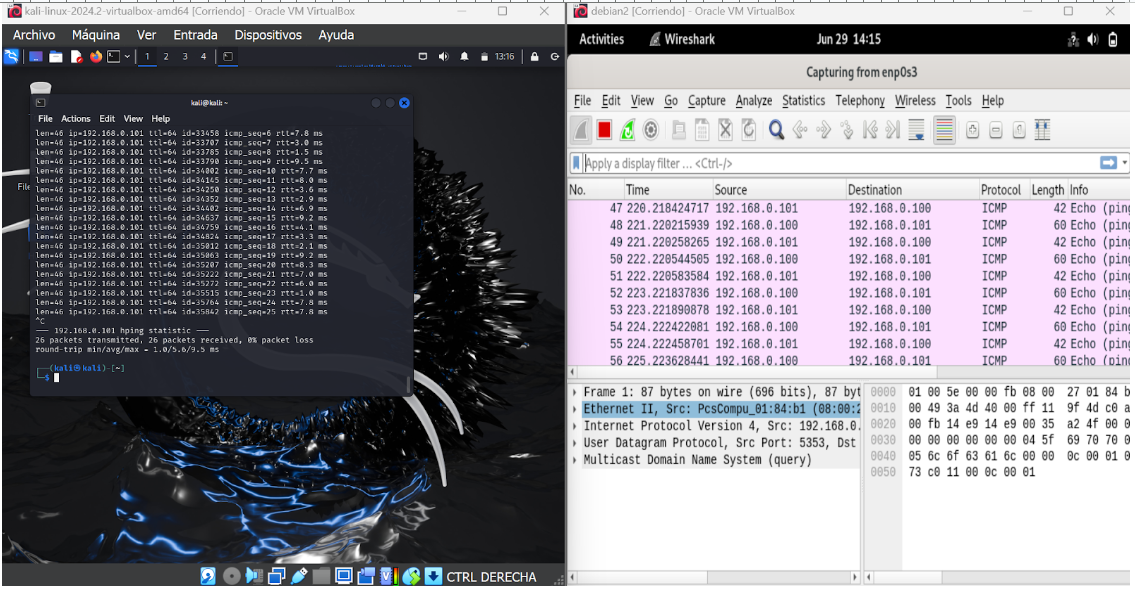
Step 4: DoS - ICMP Flood Practice
To perform an ICMP flooding attack (ping flood) from Kali to Debian, you can use the following command:
1sudo hping3 -1 <IP_debian> -I eth0
- hping3: A command-line tool for generating TCP/IP packets that can be used for various network tests, including port scanning, firewall testing, and network performance testing.
- -1: Indicates that ICMP type 1 (ICMP Echo Request) packets should be sent, which are the packets used by the ping command.
- -I eth0: Specifies the network interface to use for sending the packets. In this case, eth0 is the network interface of the attacking machine.
Monitoring and Analysis