Back End
Authentication
APIs
Javascript
Python
cybersecurity
Token Based Authentication in your API
Why implementing Token Based Authentication

There are several ways to create an authentication layer in web applications, but we are going to be focusing today in Token Based Authentication for several reasons:
- Easy to implement.
- Provides a good level of security (by industry standards).
- Fast and performant.
- The most used in the industry as of today.
What is API Authentication?
In plain English, authentication means being able to identify who is making requests to your API; You normally implement an authentication layer in your application because you want:
- Users to be able to log in and log out.
- Privacy protection: Restrict access to information based on the user role. For example: Only I should be able to update my email and password, only I should review my medical health history.
- Limit user permissions: Restrict access to certain functionalities, for example: A user needs to pay to download a book, or not being able to comment on a forum unless you log in, etc.
To explain in detail "Token Based API Authentication" it's better to start explaining about tokens.
What is a Security Token?
In a broad sense, a token is a "number that proves something." For example: when you finish making a bank transfer, the bank sends a confirmation "token" serves as proof to validate that the transaction exists and it's valid. That confirmation number could be also called a confirmation token.
Other examples for every-day tokens:
- Your social security number (token) proves your credit history.
- Your credit card number proves you have a valid credit card.
- Etc.
A security token is more than just a number
Tokens used for authentication need to be more than just plain numbers, they need to be almost impossible to fake, predict or break.
- Non-consecutive; that will make them very predictable, hackers will guess the next one.
- Infinite (almost): What will happen if you run out of tokens? Can you imagine MasterCard running out of credit card numbers?
- Non-reusable: There are cases of re-usable tokens, but in general once a token is generated, no one else should ever use it but you.
- Validatable: The token must follow some hidden pattern (encryption) that allows validating the token without compromising the owner or author.
Generating tokens
There are several types of tokens you can use for your Authentication system like Basic, Bearer, or JWT. Most of them use advanced cryptography algorithms that we are not going to address in this lesson (you can watch this amazing video to learn more). Instead, we are going to talk about hashing.
What is a hash?
A hash is a unique alphanumeric number that gets generated from a specific seed or value, for example:
With Python
1import hash_function
2
3value = "alex"
4unique_hash = hash_function(value)
Explanation: the function hash_function will always return the exact same unique_hash if the same value is given.
With JavaScript
1const jwt = require('jsonwebtoken');
2
3const payload = {
4    userEmail: 'hola@4geeks.co',
5    rol: 'admin'
6};
7
8const unique_hash = jwt.sign(payload, 'secret-key', {
9    expiresIn: '24h' // Set the expiration time to 24 hours
10});
Explanation: the function jwt.sign will always return the exact same unique_hash if the same value is given. Take a look at this demonstration, start typing on the input:
Note: There are several popular hashing functions: MD5, Sha1, Sha256, Sha256, etc.
What makes hashing functions so cool?
Hashing functions have become the best way to generate tokens in the security world because:
- They are consistent: They always return the same output to the same given input.
- They are "impossible" to reverse: If a hacker gets access to a token, they will never be able to know what was the original value.
- They have the same size: For example, all the tokens generated using MD5 will have 40 characters.
- They are "fast": Hashes rely on advanced math to efficiently generate the alphanumeric numbers.
Note: Every bitcoin wallet address has a unique hash, every commit you make in GitHub has a unique hash, etc.
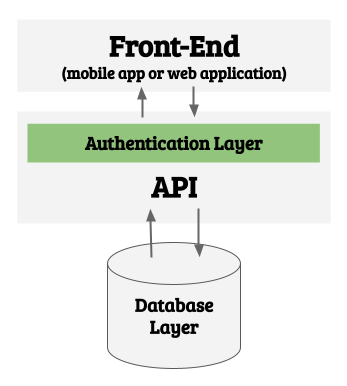
How to implement authentication in your API
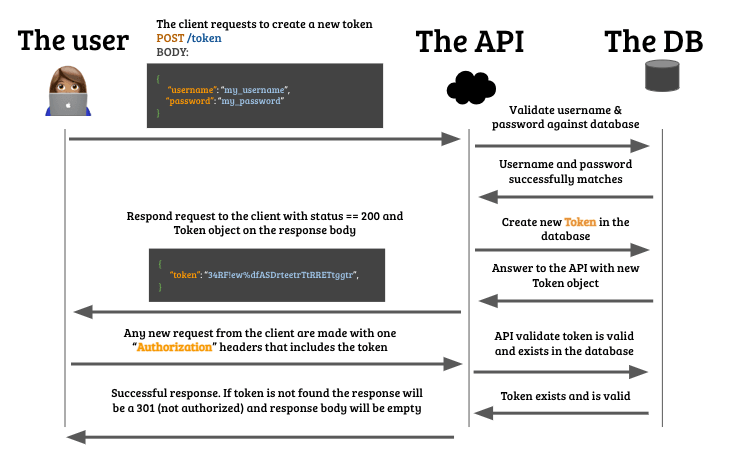
The most simple way to implement authentication in your database and API:
- Create a
Usertable/model that represents every user inside your application. - That User table must contain email and password for every user.
- Create one API endpoint called
POST /tokenthat generates a token only if it receives an email and password that matches in the database. - The
POST /tokenendpoint will return the token to the front-end if everything is okay. - Then, on every other endpoint in your database, you will have to validate if the token exists in the request header, and if it does, you will have to validate it.

Every token is a session
The moment you generate the token, you can decide if you want it to expire, same way web sessions expire when you log in into your online bank account.
When a client successfully authenticates, it will receive that unique token, and it will be able to attach to the request headers of every request it makes from that moment on. That token will be the "User session".
It is recommended to save that token in the cookies or localStorage of your front-end application.
1let myToken = "aDSA45F$%!sd&sdfSDFSDFytrefERF";
2localStorage.setItem("token", myToken);
3
4
5// You can retrieve the token at any moment, anywhere in your application, by using:
6let myToken = localStorage.getItem("token");
How to attach the token to the request header:
If you are doing a request from the Front-End this will be an ideal way to attach the token to your Authorization headers:
1let myToken = localStorage.getItem("token");
2fetch('https://myApi.com/path/to/endpoint', {
3    method: "POST", // or any other method
4    headers: {
5      "Authorization": myToken, // ⬅⬅⬅ authorization header
6    },
7    body: JSON.stringify(body)
8})
9    .then(resp => resp.json())
10    .then(data => console.log("Success!!", data))
11    .catch(error => console.log(error));
Json Web Token for API authentication
There are many ways to create tokens: Basic, Bearer, JWT, etc. All of them are different in nature but all of them result in the same output: A hash (a big alphanumeric token).
| Type of token | How it looks |
|---|---|
| Basic Token | ecff2099b95ed507a27a4717ec78965d529cc346 |
| Bearer Token | YWxlc2FuY2hlenI6NzE0YmZhNDNlN2MzMTJiZTk5OWQwYWZlYTg5MTQ4ZTc= |
| JWT Token | eyJhbGciOiJIUzI1NiIsInR5c.eyJzdWIiOFt2MjM5MDIyfQ.SflKxwRJSMeKKF2QT4fwpM |
☝️ As you can see, JWT Tokens are bigger than the other two types of tokens.
JSON Web Token, or JWT is an open standard to create tokens
This standard has become quite popular since it's very effective for Web Apps like Google APIs, where, after user authentication you make API requests.
JSON Web Token is a type of token that includes a structure that can be decrypted by the server and allows you to authenticate the identity of the user of that application.
Why use JWT Token?
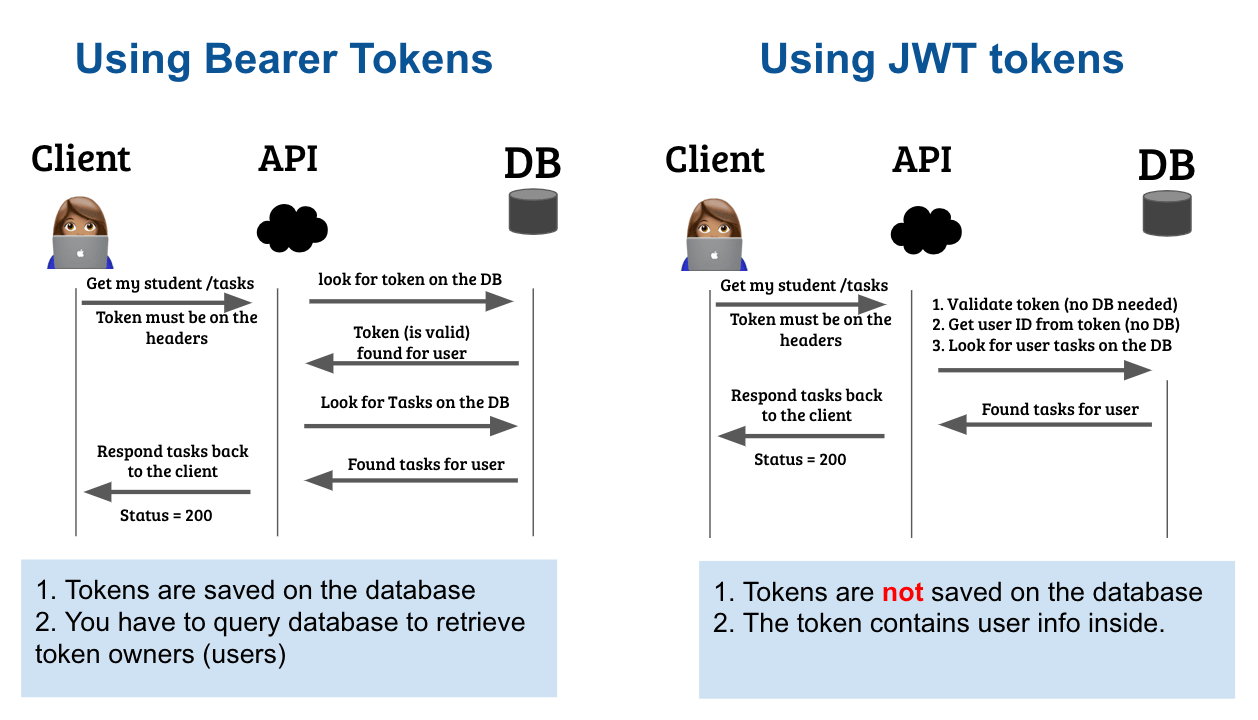
In a nutshell: JWT is an amazing alternative because Basic Token is too simple and easy to hack, and Bearer Token is harder to maintain because you have to store each token on the database.
With JWT Tokens you don't need a database, the token itself contains all the information needed.

📹 Here is a video explaining the JWT authentication implementation using React.js, Context API and Python Flask.
Structure of the JWT Token

You may notice that the string is divided into three sections, separated by a dot . - each section has it meaning:
| Section name | |
|---|---|
| HEADER | The first part stores the type of token and the encryption algorithm |
| PAYLOAD | The second part has the data that identifies the user: it can be their ID, username, etc. |
| SIGNATURE | A digital signature, which is generated with the previous two sections, which allows you to verify if the content has been modified. |
How API Authentication works?
You can divide a standard authentication process into 5 main steps:
- The user writes their username and password on your website.
- The username and password get sent to the backend API.
- The API looks for any record on the
Usertable that matches both parameters at the same time (username and password). - If a user is found, it generates a
tokenfor that user and respondsstatus_code=200back to the front end. - The front-end will use that
tokenfrom now on to make any future request.

☝️ If you don't know what a token is, I would recommend this reading.
Implementing JWT using Python Flask
I strongly recommend using Flask JWT Extended.
Implementing JWT using Node.js Express
Generate tokens with Node JSONWebToken. Also use Express JWT to enforce the private endpoints.