Deploy model using Flask and Heroku
Deployment of a Machine learning model using Flask and Heroku
Machine Learning models are powerful tools to make predictions based on available data. In order to make these models useful for society, they need to be deployed so that others can easily access them to make predictions. This can be done using Flask and Heroku.
Flask is a small and lightweight Python web framework that provides useful tools and features that make creating web applications easier using only a Python file.
Heroku is a cloud platform that lets you build, deliver, monitor and scale apps. Heroku makes the processes of deploying, configuring, scaling, tuning, and managing apps as simple and straightforward as possible so that developers can focus on building great apps. It also includes a rich ecosystem of managed data services.
Let's imagine we have just finished creating our Titanic survival prediction model. Now what?
In order to predict with unknown data, we have to deploy it over the internet so that the outside world can use it.
For that, we will need to save the model so that we can predict the values later. We make use of Pickle in Python which is a powerful algorithm for serializing and deserializing a Python object structure, but there are other tools too. The following code saves the model using Pickle:
1# Serializing our model to a file called model.pkl
2import pickle
3filename = 'model.pkl'
4pickle.dump(classifier, open(filename,'wb'))
Steps to create a web app using Flask in Python3
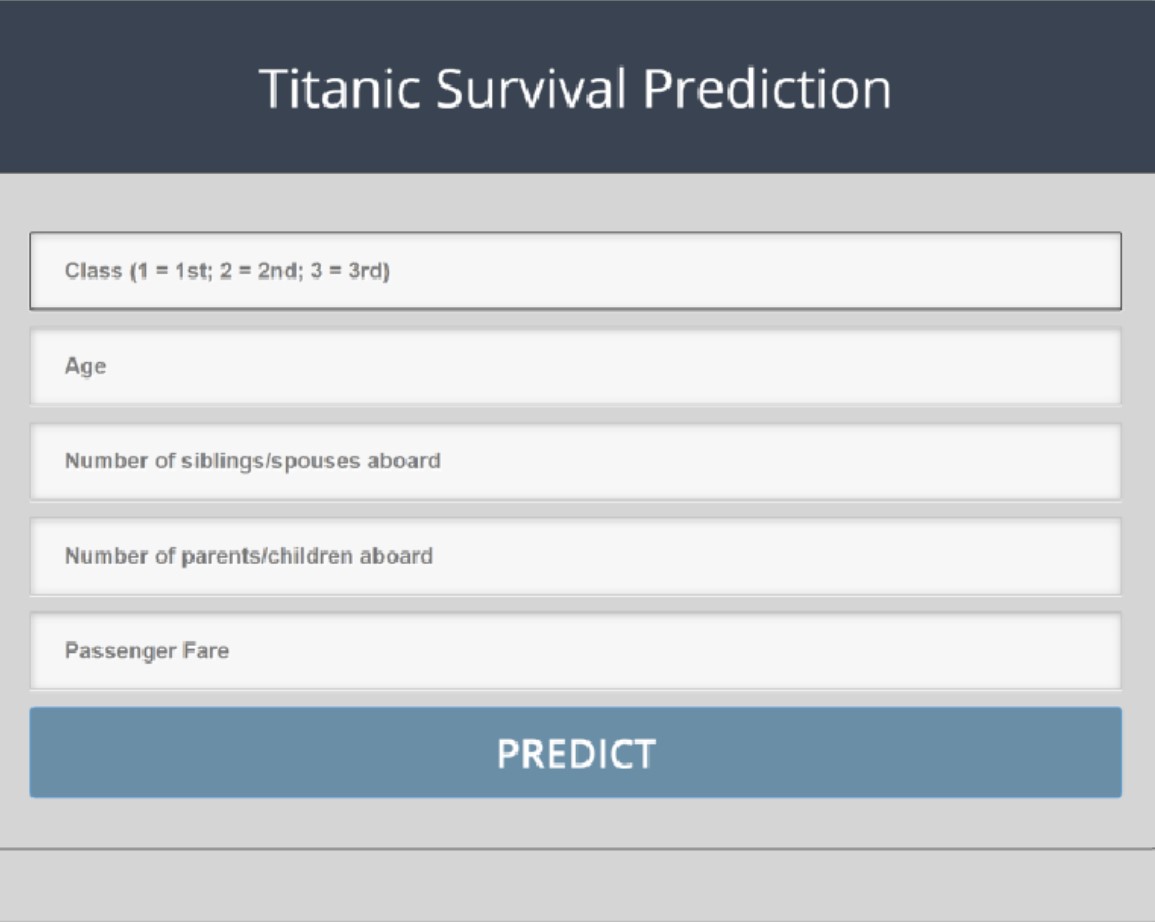
For predicting survival in the Titanic from various attributes, we first need to collect the data (new attribute values) and then use the model we built to predict whether a passenger would survive or not in the Titanic. Therefore, in order to collect the data, we create an HTML form which would contain all the different options to select from each attribute. Here, I have created a simple form using only HTML. If you want to make the form more interactive, you can do so as well.

Step 1: Activate environment and install Flask
In the command line, enter your project's directory. Once there, activate your environment and use pip to install Flask.
1pip install Flask
Step 2: Create a basic application
In your directory, open a file named hello.py for editing. This file will serve as a minimal example of how to handle HTTP requests. Inside, you will import the Flask object and create a function that returns an HTTP response. Write the following code inside hello.py:
1from flask import Flask
2
3app = Flask(__name__)
4
5
6@app.route('/')
7def hello():
8    return 'Hello, World!'
Let's explain what the previous code just did. It first imports the Flask object from the flask package. You will then use it to create your Flask application instance with the name app. Pass the special variable __name__ which holds the name of the current Python module. It is used to tell the instance where it is located. You will need to do this because Flask sets up some paths in the background.
Once you create the app instance, you use it to handle incoming web requests and send responses to the user. @app.route is a decorator that converts a regular Python function into a Flask view function, which converts the function's return value into an HTTP response that will be displayed by an HTTP client, such as a web browser. Pass the value '/' to @app.route() to indicate that this function will respond to web requests for the URL /, which is the primary URL.
The hello() view function returns the string 'Hello, World!' in response.
Save and close the file.
To run your web application, you will first tell Flask where to find the application (the hello.py file in your case) with the FLASK_APP environment variable:
1export FLASK_APP=hello
Then, execute it in development mode with the environment variable FLASK_ENV:
1export FLASK_ENV=development
Finally, execute the app using flask run:
1flask run
Once it is running, the result should look similar to this:
1Output
2 * Serving Flask app "hello" (lazy loading)
3 * Environment: development
4 * Debug mode: on
5 * Running on http://127.0.0.1:5000/ (Press CTRL+C to quit)
6 * Restarting with stat
7 * Debugger is active!
8 * Debugger PIN: 813-894-335
The above result has some information, such as:
-
The name of the application you are running.
-
The environment in which the application is running.
-
Debug mode: on means that the Flask debugger is running. This is useful during development because it gives us detailed error messages when something goes wrong, which makes it easier to troubleshoot problems.
-
The application runs locally on the URL
http://127.0.0.1:5000/, 127.0.0.1 is the IP representing your computer's localhost and :5000 is the port number.
Now open a browser and type the URL http://127.0.0.1:5000; you will receive the string Hello, World! in response. This confirms that your application is running correctly.
You now have a small Flask web application. You have run your application and displayed information in the web browser. Next, you will use the HTML files in your application.
Step 3: Using HTML templates
Currently, your application only displays a simple message without HTML. Web applications primarily use HTML to display information to the visitor, so you will now work to incorporate a HTML file into your application, which can be displayed in the web browser.
Flask provides a render_template() helper function that allows the use of the Jinja template engine. This will make managing HTML much easier by writing your HTML code in .html files, in addition to using logic in your HTML code. You will use these HTML files, (templates), to create your web application.
In this step, you will create your main Flask application in a new file.
First, in your project directory, use your favorite text editor to create and edit your app.py file. Previously, you have been using the app.py to write the code for your final model. To avoid confusion, now you will use a model.py or a titanic.py for that, and the app.py will exclusively be to build your web app. This will host all the code you will use to create the application.
In this new file, you will import the Flask object to create a Flask application instance, as you did before. You will also import the render_template() helper function that allows you to render HTML template files that exist in the templates folder you are about to create. The file will have a single view function that will be responsible for handling requests to the main / path. Add the following content:
1import numpy as np
2import flask
3import pickle
4from flask import Flask, render_template, request
5
6app = Flask(__name__)
7
8@app.route('/')
9def index():
10    return render_template('index.html')
The index() view function returns the result of invoking render_template() with index.html as an argument; this instructs render_template() to look for a file named index.html in the templates folder. The folder and file do not exist yet, and you will receive an error if you run the application at this point. You are going to run it anyway, so that you are familiar with this commonly encountered exception. You will then resolve it by creating the necessary folder and file.
Save the file and close it.
Stop the development server on your other terminal running the hello application with Ctrl + c.
Before running the application, be sure to correctly specify the value for the FLASK_APP environment variable, since you are not using the hello application now.
1export FLASK_APP=app
2flask run
When you open the URL http://127.0.0.1:5000 in your browser, the debugger page will be displayed, informing you that the index.html template was not found. The main line of code in the code responsible for this error will be highlighted. In this case, it is the line return render_template('index.html').
If you click on this line, the debugger will reveal more code so that you have more context to help you resolve the problem.
You will probably see an error showing template not found (index.html).
Let's create folder templates. In your application, you will use templates to render HTML, which will display in the user's browser. This folder contains our HTML form file index.html. Start editing your index.html file by writing the following code:
1<!DOCTYPE html>
2<html lang="en">
3<head>
4    <meta charset="UTF-8">
5    <title>ML app</title>
6</head>
7<body>
8   <h1>Welcome to my Titanic Survival prediction app</h1>
9</body>
10</html>
In addition to the templates folder, Flask web applications also typically have a static folder to house files, such as the CSS files, JavaScript files, and images that the application uses.
You can create a style.css stylesheet file to add CSS to your application. First, create a directory called static inside your main project directory. Then create another directory called css inside static to host the .css files. The same can be done for js files and images for more complex apps.
Inside your css directory, create a style.css file and add the following rule:
1h1 {
2    border: 2px #eee solid;
3    color: brown;
4    text-align: center;
5    padding: 10px;
6}
This code will add a border, change the color to brown, center the text and add a small padding to the h1 tags.
Save and close the file.
In your index.html file you will add a link to your style.css file:
1<head>
2    <meta charset="UTF-8">
3    <link rel="stylesheet" href="{{ url_for('static', filename= 'css/style.css') }}">
4    <title>Welcome to my Titanic Survival prediction app</title>
5</head>
Here, you use the helper function url_for() to generate the appropriate file location. The first argument specifies that you are linking to a static file, and the second argument is the path to the file within the static directory.
Save and close the file.
After updating your application's index page, you will notice that the Welcome to my Titanic Survival prediction app text is now brown, centered, and framed within a border.
You can put the style you want to your style.css file. However, the Bootstrap tool kit can help you with this if you are not an expert. Now, if your application will have more than one page, then you can avoid unnecessary repetition of code with the help of a base template file, from which all your HTML files will inherit. If that is the case, you can write the following code in your base.html file:
1<!doctype html>
2<html lang="en">
3  <head>
4    <!-- Required meta tags -->
5    <meta charset="utf-8">
6    <meta name="viewport" content="width=device-width, initial-scale=1, shrink-to-fit=no">
7
8    <!-- Bootstrap CSS -->
9    <link rel="stylesheet" href="https://stackpath.bootstrapcdn.com/bootstrap/4.3.1/css/bootstrap.min.css" integrity="sha384-ggOyR0iXCbMQv3Xipma34MD+dH/1fQ784/j6cY/iJTQUOhcWr7x9JvoRxT2MZw1T" crossorigin="anonymous">
10
11    <title>{% block title %} {% endblock %}</title>
12  </head>
13  <body>
14    <nav class="navbar navbar-expand-md navbar-light bg-light">
15        <a class="navbar-brand" href="{{ url_for('index')}}">FlaskBlog</a>
16        <button class="navbar-toggler" type="button" data-toggle="collapse" data-target="#navbarNav" aria-controls="navbarNav" aria-expanded="false" aria-label="Toggle navigation">
17            <span class="navbar-toggler-icon"></span>
18        </button>
19        <div class="collapse navbar-collapse" id="navbarNav">
20            <ul class="navbar-nav">
21            <li class="nav-item active">
22                <a class="nav-link" href="#">About</a>
23            </li>
24            </ul>
25        </div>
26    </nav>
27    <div class="container">
28        {% block content %} {% endblock %}
29    </div>
30
31    <!-- Optional JavaScript -->
32    <!-- jQuery first, then Popper.js, then Bootstrap JS -->
33    <script src="https://code.jquery.com/jquery-3.3.1.slim.min.js" integrity="sha384-q8i/X+965DzO0rT7abK41JStQIAqVgRVzpbzo5smXKp4YfRvH+8abtTE1Pi6jizo" crossorigin="anonymous"></script>
34    <script src="https://cdnjs.cloudflare.com/ajax/libs/popper.js/1.14.7/umd/popper.min.js" integrity="sha384-UO2eT0CpHqdSJQ6hJty5KVphtPhzWj9WO1clHTMGa3JDZwrnQq4sF86dIHNDz0W1" crossorigin="anonymous"></script>
35    <script src="https://stackpath.bootstrapcdn.com/bootstrap/4.3.1/js/bootstrap.min.js" integrity="sha384-JjSmVgyd0p3pXB1rRibZUAYoIIy6OrQ6VrjIEaFf/nJGzIxFDsf4x0xIM+B07jRM" crossorigin="anonymous"></script>
36  </body>
37</html>
Save and close the file once you have finished editing it.
Most of the code in the block above is standard HTML and code required for Bootstrap. The <meta> tags provide information for the web browser, the <link> tag links to Bootstrap CSS files, and the <script> tags are links to JavaScript code that enables some additional Bootstrap functionality.
However, the following highlighted parts are specific to the Jinja template engine:
-
{% block title %} {% endblock %}: a block that serves as a placeholder for a title. You will later use it in other templates to give a custom title to each page of your application without having to rewrite the entire<head>section each time. -
{{ url_for('index')}}: a function invocation that will return the URL for theindex()view function. This is different from the previousurl_for()invocation you used to link to a static CSS file because it only requires one argument, which is the name of the view function, and links to the path associated with the function rather than to a static file. -
{% block content %} {% endblock %}: another block that will be replaced by content, depending on the secondary template (templates that inherit frombase.html) that will override it.
Now that you have a base.html template, you can inherit that code into index.html by only adding the following code in your index.html:
1{% extends 'base.html' %}
2
3{% block content %}
4    <h1>{% block title %} Welcome to FlaskBlog {% endblock %}</h1>
5{% endblock %}
You have used HTML templates and static files in Flask in a clean way. However, to make things simple for your first web app, we will keep only the index.html file.
Let's see how we should code a form requesting the attributes of our passengers.
In order to predict the data correctly, the corresponding values of each label should match with the value of each input selected.
In the Titanic form that you saw at the beginning of this lesson, we were only requesting the numerical features for prediction, but in the case where we include categorical features that were previously label encoded, we need to put the same values in the HTML form. The following example shows how the form should be coded in case our 'Sex' feature would have been assigned 0 for Male and 1 for Female:
1<label for="Sex">Gender</label>
2    <select id="relation" name="relation">
3      <option value="0">Male</option>
4      <option value="1">Female</option>
5    </select>
You can find a couple of form examples in the following link:
https://www.geeksforgeeks.org/html-design-form/
Step 4: Predicting the survival result
Let's run the application.
1export FLASK_APP=app.py
2run flask
When someone submits the form, the webpage should display the result if a passenger would survive or die in the Titanic. For this, we require the model file (model.pkl) we created before, in the same project folder. We add the following code to the app.py file:
1# Prediction function
2def ValuePredictor(to_predict_list):
3    to_predict = np.array(to_predict_list).reshape(1,12)
4    loaded_model = pickle.load(open("model.pkl","rb"))
5    result = loaded_model.predict(to_predict)
6    return result[0]
7
8
9@app.route('/result',methods = ['POST'])
10def result():
11    if request.method == 'POST':
12        to_predict_list = request.form.to_dict()
13        to_predict_list = list(to_predict_list.values())
14        to_predict_list = list(map(int, to_predict_list))
15        result = ValuePredictor(to_predict_list)
16
17        if int(result)==1:
18            prediction='Passenger survives'
19        else:
20            prediction='Passenger dies'
21
22        return render_template("result.html",prediction=prediction)
Here, after the form is submitted, the form values are stored in the variable to_predict_list in the form of a dictionary. We convert it into a list of the dictionary's values and pass it as an argument to the ValuePredictor() function. In this function, we load the model.pkl file, predict the new values, and return the result.
This result/prediction (whether the passenger survives or not) is then passed as an argument to the template engine with the HTML page to be displayed.
Create the following result.html file and add it to the templates folder.
1<!doctype html>
2<html>
3   <body>
4       <h1>{{ prediction }}</h1>
5   </body>
6</html>
An alternative code for the entire app.py file could be:
1import numpy as np
2from flask import Flask, request, render_template
3import pickle
4
5app = Flask(__name__)
6model = pickle.load(open('model.pkl', 'rb'))
7
8@app.route('/')  # http://www.google.com/
9def home():
10    return render_template('index.html')
11@app.route('/predict', methods=['POST'])
12def predict():
13    '''
14    For rendering results on HTML GUI
15    '''
16    int_features = [int(x) for x in request.form.values()]
17    final_features = [np.array(int_features)]
18    prediction = model.predict(final_features)
19
20    output = round(prediction[0], 2)
21
22    return render_template('index.html', prediction_text='Would you survive? {} (1=survived, 0=deceased)'.format(output))
23
24if __name__=="__main__":
25    app.run(port=5000, debug=True)
Run the application again and it should predict the result after submitting the form. We have successfully created the Web application. Now it's time to use Heroku to deploy it.
Deployment using Heroku
You should already have an account on Heroku, but if you don't, go ahead and create your account at https://www.heroku.com.
Let's make sure we also have the following before deploying to Heroku:
- Gunicorn handles requests and takes care of complicated things. Download
gunicornto your virtual environment. You can usepipto download it.
1pip install gunicorn
-
We have installed a lot of libraries and other important files like flask, gunicorn, sklearn etc. We need to tell Heroku that our project requires all these libraries to successfully run the application. This is done by creating a
requirements.txtfile. -
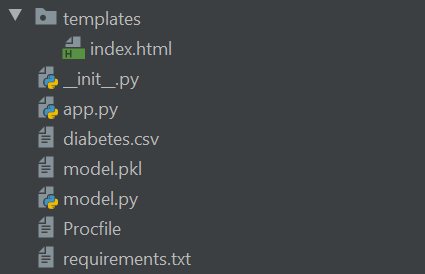
Procfileis a text file in the root directory of your application to explicitly declare what command should be executed to start your app. This is an essential requirement for Heroku. This file tells Heroku we want to use the web process with the command gunicorn and the app name.
1web: gunicorn app:app
Your current structure should be looking something like this:

- Finally, use a
.gitignorefile to exclude unnecessary files that we don't want to deploy to Heroku.
We are ready! Push your project to Heroku! If you wish to do it directly on Heroku's website, you can do it as follows:
-
Click on 'Create a new app'
-
On 'deploy' tab: link Heroku app to your GitHub account and select the repo to connect to.
-
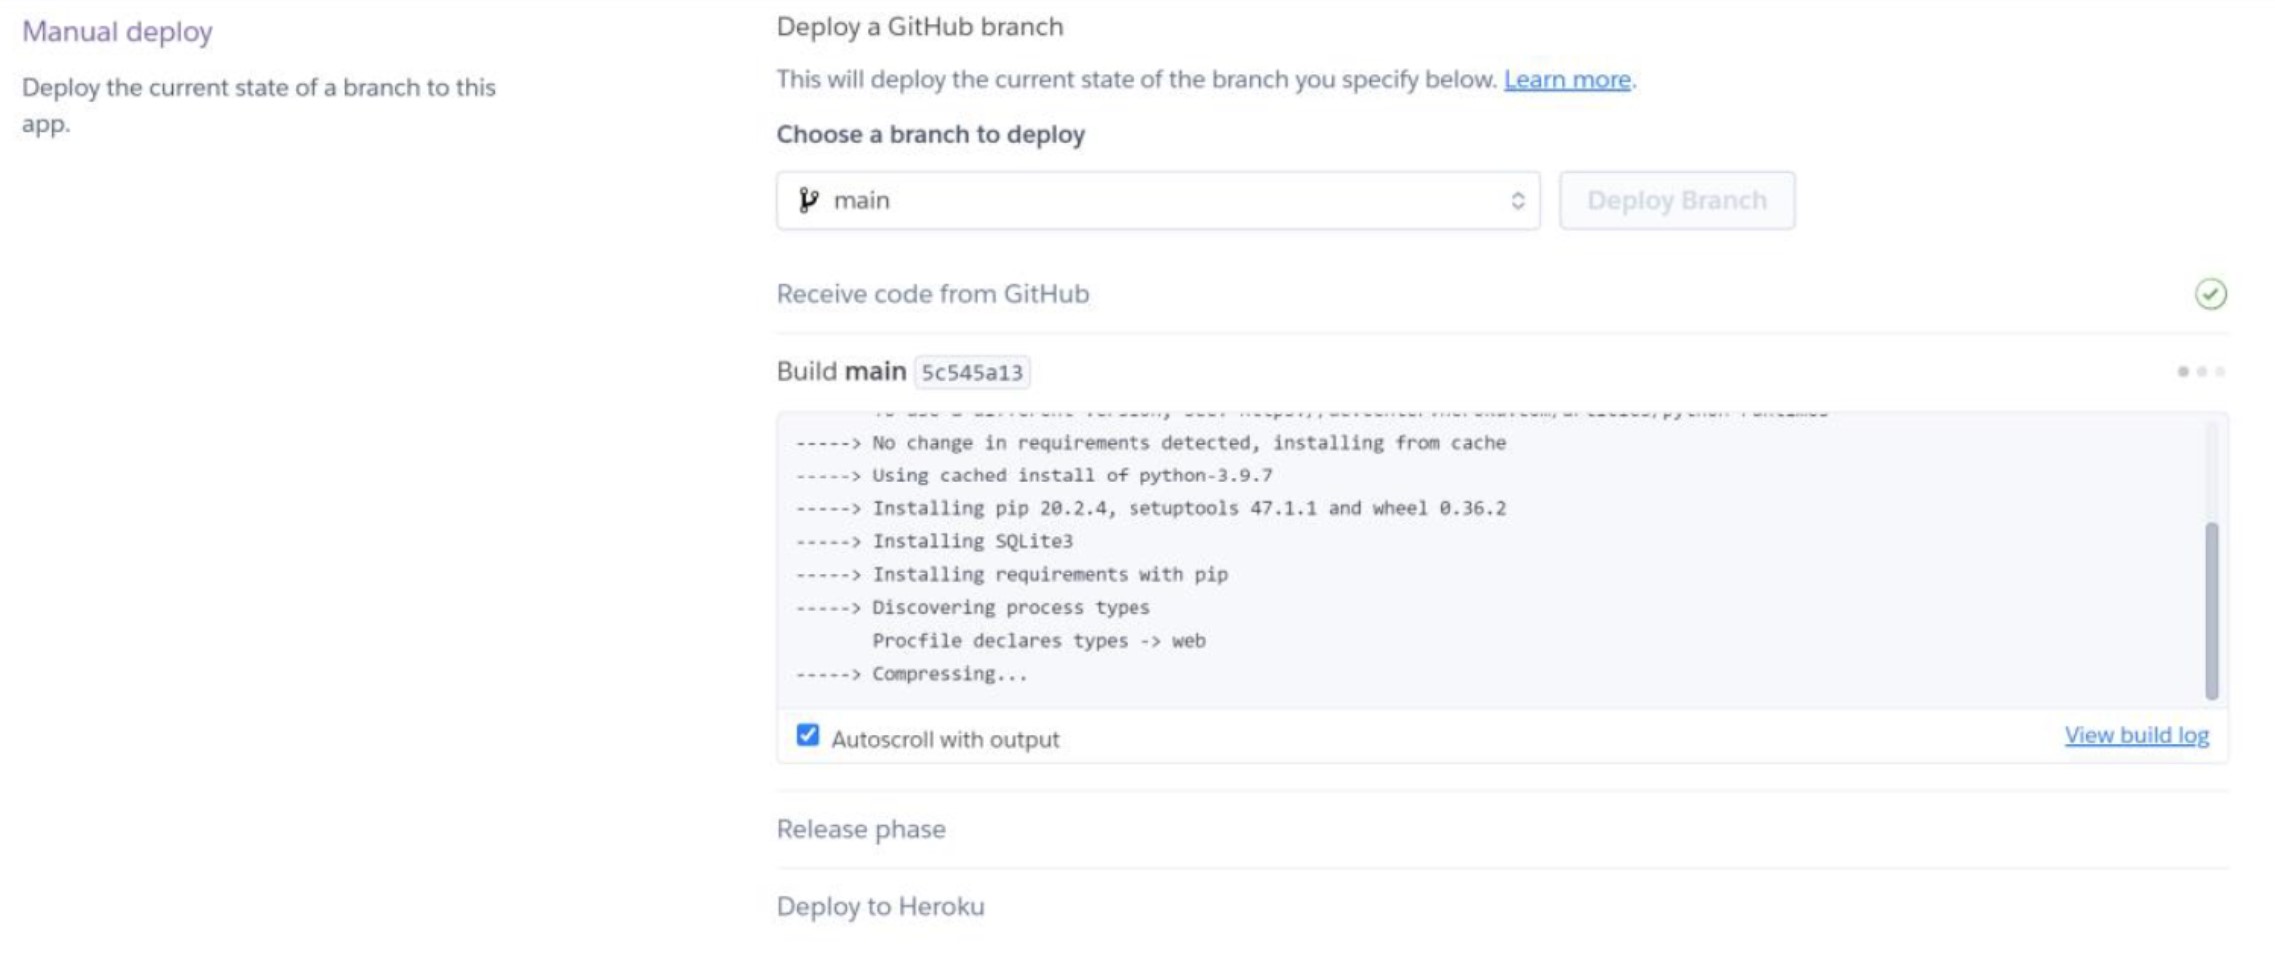
Scroll down and choose 'manual deploy'. After making sure you are on the branch you want to deploy (in this case:
main), click on 'Deploy branch'. You will see all the required packages have been installed, as shown in the following image:

- When finished, it should look like the following screenshot:

- Copy that link and paste it in your browser to test your app.
If you feel more comfortable with the command line, you will need to have git and Heroku CLI installed, and then follow this steps:
You can click on the following link to install Heroku CLI: https://devcenter.heroku.com/articles/heroku-cli
1heroku login
1heroku create
1git init
2git add .
3git commit -m 'initial commit'
1git push heroku master
2heroku open
Go ahead and test your web app!
Source: