Self-paced

Explore our extensive collection of courses designed to help you master various subjects and skills. Whether you're a beginner or an advanced learner, there's something here for everyone.

Bootcamp

Learn live

Join us for our free workshops, webinars, and other events to learn more about our programs and get started on your journey to becoming a developer.

Upcoming live events

Learning library

For all the self-taught geeks out there, here is our content library with most of the learning materials we have produced throughout the years.

It makes sense to start learning by reading and watching videos about fundamentals and how things work.

Search from all Lessons


LoginGet Started
โ† Back to Lessons
Edit on Github

Global state with the Context API

The problem (life before Context API)
Now everything together
  • Simple implementation

The problem (life before Context API)

๐Ÿ˜„ why life before the Context API was harder

People say that React.js makes the easy stuff hard and the hard stuff easy. It's funny because it's true ๐Ÿ˜“. These are some of the things they mean:

  1. Why is sharing data throughout the application so hard? Where are my global variables?

  2. Why is it so hard to pass data between components? A.K.A. props. Props are fine when you want to pass data between parent and child, but what happens when we need to go deeper? This is called "Props Hell" or "Prop Drilling".

  3. Redux?? Overkill.

The Solution: The Context API is here to save you

In general, the context API can solve this problems by:

  1. Centralizing a global application state: Instead of being limited to local states on views, you can now share data on one central component and spread to its inner components (children, grandchildren and so forth). The centralized state is called store, and we can spread it by using the Context.Provider.

  2. Data propagation and re-rendering: when this centralized global state (store) changes, it triggers a re-render of all the child components (your entire application), which produces new data to show in the UI. A central setStateish.

  3. If you've already worked with React, you've probably felt the frustration of passing properties throughout your application, we call it "property hell".

How does the Context API work?

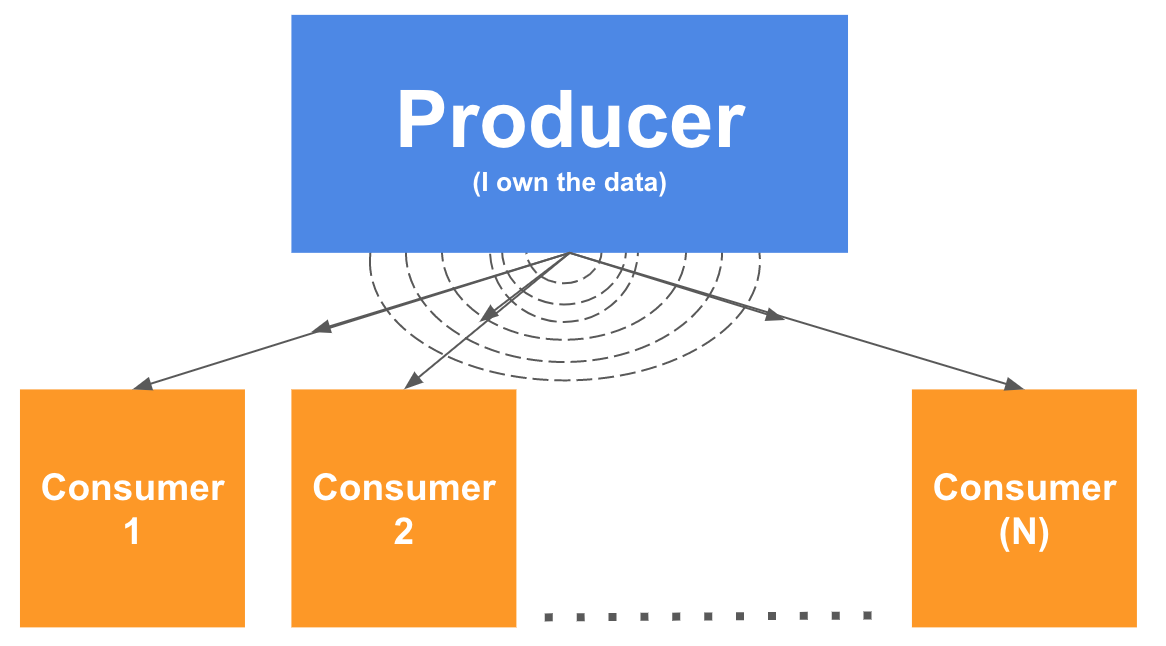
The concept behind it is very simple: There is one big Provider, that provides the data to many Consumers, and there's no limit in the amount of consumers you can use.

Every time the data stored within the Provider changes, all the Consumers update. It is very similar to how TV signals work: TV channels emit a data signal, and all TV antennas consume this signal, receiving the new content and rendering the image on the televisions.

Everyone has access to the global context now.

Context API Explanation

Unidirectional data flow

The biggest use of the Context API is to create a global context within your entire React.js application.

The store is now the most delicate piece of data in our application, and it is susceptible to bad usage, i.e. one bad change and the whole application will crash. To avoid this possible scenario, we have to make sure the store's data is read-only for the consumers, and can be updated only by a limited set of functions. Just like the regular state, we don't change the state, we set it again. This architecture paradigm is called Flux.

Flux

We must split the store from the actions and the views (components) and make sure that the views call actions to update the store. We will never directly change the store from a view. I know, I'm being redundant on purpose...

Now everything together

  • We're going to implement a single point of truth for the whole React application: global state.
  • This state will contain the data and functions to set the new state: store and actions.
  • We're going to deliver it throughout the whole application using the: useContext() hook.

Simple implementation

Ok, after a couple of hours to make the context API implementation simpler without using bindings... this is what I got in 4 simple steps!:

  • Step 1 (Create the context): This step has almost no logic, just call the createContext function from React. That object will be shared within all the consumers during the application's lifetime, it will contain the application store and actions.

AppContext.js

1// Step 1: Define a context that will be shared within all the app 2 3import React from 'react'; 4 5const AppContext = React.createContext(null);
  • Step 2 (Store and Actions): Create a ContextWrapper component which will be used to pass the context (step 1) to the Consumers. The ContextWrapper's state is where we declare our initial global state, which includes the data (store) and the functions (actions).

Note that we have to export both AppContext and ContextWrapper.

AppContext.js

1// Step 2: Create a ContextWrapper component that has to be the parent of every consumer 2 3import React, { useState } from 'react'; 4 5export const AppContext = React.createContext(null); 6 7export const ContextWrapper = (props) => { 8 const [ store, setStore ] = useState({ 9 todos: ["Make the bed", "Take out the trash"] 10 }); 11 const [ actions, setActions ] = useState({ 12 addTask: title => setStore({ ...store, todos: store.todos.concat(title) }) 13 }); 14 15 return ( 16 <AppContext.Provider value={{ store, actions }}> 17 {props.children} 18 </AppContext.Provider> 19 ); 20}
  • Step 3 (Views): Now your main component can be wrapped inside ContextWrapper so that all child components will have access to the Context. For this quick example, we will be using the <TodoList /> component as our main component (the declaration is on the last step).

index.js

1// Step 3: Wrap your main component in the ContextWrapper 2 3import React from 'react'; 4import ReactDOM from 'react-dom'; 5 6import { ContextWrapper } from 'path/to/AppContext.js'; 7import TodoList from 'path/to/TodoList'; 8 9const MyView = () => ( 10 <ContextWrapper> 11 <TodoList /> 12 </ContextWrapper> 13 ); 14 15ReactDOM.render(<MyView />, document.querySelector("#app"));
  • Step 4: Now we can create the TodoList component, knowing that we can use useContext() hook to read the store from the global state (no props necessary).

In this case, the component will render the to-do's and also be able to add new tasks to the list.

1// Step 4: Declare a variable with the hook useContext(), then use it as an object to access any code inside of it 2 3import React, { useContext } from 'react'; 4import { AppContext } from 'path/to/AppContext.js'; 5 6export const TodoList = () => { 7 const context = useContext(AppContext); 8 return <div> 9 {context.store.todos.map((task, i) => (<li key={i}>{task}</li>))} 10 <button onClick={() => context.actions.addTask("I am the task " + context.store.todos.length)}> + add </button> 11 </div> 12}

Very often we will use the useContext hook that you see above

1const context = useContext(AppContext); 2return <div> 3 {context.store.todos.map((task, i) => (<li key={i}>{task}</li>))} 4 <button onClick={() => context.actions.addTask("I am the task " + context.store.todos.length)}> + add </button> 5</div>

In its destructured variant. Pay attention to how that also simplifies the way we then access the store:

1const {store, actions} = useContext(AppContext); 2return <div> 3 {store.todos.map((task, i) => (<li>{task}</li>))} 4 <button onClick={() => actions.addTask("I am the task " + store.todos.length)}> + add </button> 5</div>

Test the code live