Start interactive tutorial
Conditional Profile Card Generator
Note: If you are working locally, make sure that you have node.js installed in your computer by typing in your terminal:
1$ node -v
🌱 How to start this project
This project comes with the necessary files to start working immediately.
We recommend opening this very same repository using a provisioning tool like Codespaces (recommended) or Gitpod. Alternatively, you can clone it on your local computer using the git clone command.
This is the repository you need to open:
1https://github.com/breatheco-de/exercise-conditional-profile-card.git
👉 Please follow these steps on how to start a coding project.
To see the result in the browser, you will need to start the project by running the following command in your terminal:
1$ npm run start
💡 Important: Remember to save and upload your code to GitHub by creating a new repository, updating the remote (
git remote set-url origin <your new url>), and uploading the code to your new repository using theadd,commitandpushcommands from the git terminal.
Some context
As a web developer, you will be creating lots and lots of dynamic HTML using JavaScript based algorithms.
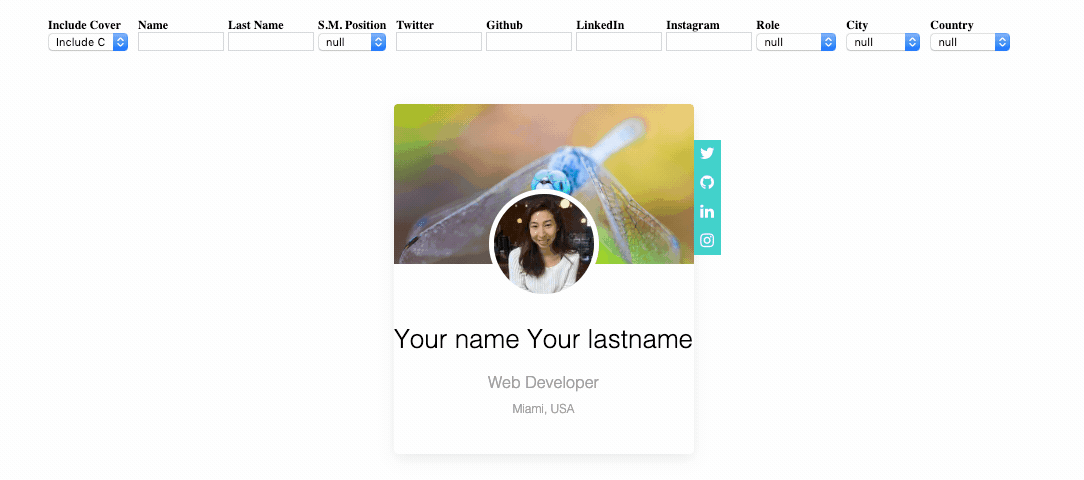
In this exercise, you have to create the HTML code needed to render a profile card based on a series of variables that could change in value during runtime. Here is an example of the profile card:
Inside the src/app.js file there is a render function that receives variables and contains the logic to create most of the website HTML code.
1function render(variables = {}) {
2  document.querySelector("#widget_content").innerHTML = `<div>Website code</div>`;
3}
You can see the variables that are being generated by typing on the developer console:
1console.log(window.variables);
2/*
3{
4    includeCover: true, // if includeCover is true the algorithm should show the cover image
5    background: "https://images.unsplash.com/photo-1511974035430-5de47d3b95da", // this is the image's url that will be used as a background for the profile cover
6    avatarURL: "https://storage.googleapis.com/breathecode-asset-images/3c15f2d5e8b14c8b5bc801cf99a02f1c88a450303a550a875e395b9ae099fa54.jpg", // this is the url for the profile avatar
7    socialMediaPosition: "left", // social media bar position (left or right)
8
9    twitter: null, // social media usernames
10    github: "alesanchezr",
11    linkedin: null,
12    instagram: null,
13
14    name: null,
15    lastName: null,
16    role: null,
17    country: null,
18    city: null
19}
20*/
📝 Instructions
These instructions come with a video for better understanding: https://youtu.be/gaVm8eyCqlM
-
Read and understand the
renderfunction and the value of thevariablesvariable that it receives. -
Change the content of the
renderfunction to make it render the variables on the card.
💡 Attention!
You do not need to add any event listeners to the elements that are already built in the project. This is already being done by this part of the code:
1document.querySelectorAll(".picker").forEach(function(elm) {
2    elm.addEventListener("change", function(e) {
3      // <- add a listener to every input
4      const attribute = e.target.getAttribute("for"); // when any input changes, collect the value
5      let values = {};
6      values[attribute] =
7        this.value == "" || this.value == "null"
8          ? null
9          : this.value == "true"
10          ? true
11          : this.value == "false"
12          ? false
13          : this.value;
14      render(Object.assign(window.variables, values)); // render again the card with new values
15    });
16  });
So when the elements contents "change" they will already update the variable values for each element. All you need to do is to update the HTML content inside render function, as mentioned on instruction 1.
Initial Variable Values
| Name | Type | Default Value | Description |
|---|---|---|---|
| includeCover | boolean | true | it determines if the cover shoud be visible with an image or not |
| background | string | null | the image's url that will be used as a background for the profile cover |
| avatarURL | string | null | the url for the profile avatar |
| socialMediaPosition | string | "right" | it can be left or right and it determines where to place the social media bar |
| string | null | the twitter username to be displayed on the profile | |
| github | string | null | the github username to be displayed on the profile |
| string | null | the linkedin username to be displayed on the profile | |
| string | null | the instagram username to be displayed on the profile | |
| name | string | null | The name of the user to be displayed on the profile |
| lastName | string | null | The name of the user to be displayed on the profile |
| role | string | null | The name of the user to be displayed on the profile |
| country | string | null | The name of the user to be displayed on the profile |
| city | string | null | the city of the user to be displayed on the profile |
Hard-Coded HTML
This is an example of a possible HTML output, you will have to replace the name, last name, etc. With the values that these variables may have.
1<div class="widget">
2  <div class="cover"><img src="https://the_url.com/for_the_background.png" /></div>
3  <img src="https://the_url.com/for_the_image.png" class="photo" />
4  <h1>Ryan Boylett</h1>
5  <h2>Web Developer</h2>
6  <h3>Miami, USA</h3>
7  <ul class="position-right">
8    <li><a href="https://twitter.com/alesanchezr"><i class="fa fa-twitter"></i></a></li>
9    <li><a href="https://github.com/alesanchezr"><i class="fa fa-github"></i></a></li>
10    <li><a href="https://linkedin.com/alesanchezr"><i class="fa fa-linkedin"></i></a></li>
11    <li><a href="https://instagram.com/alesanchezr"><i class="fa fa-instagram"></i></a></li>
12  </ul>
13</div>
This and many other projects are built by students as part of the 4Geeks Academy Coding Bootcamp by Alejandro Sanchez and many other contributors. Find out more about our Full Stack Developer Course, and Data Science Bootcamp.